What this is for#
You want to turn your website traffic into mail-list subscribers. AcelleMail has a visual form builder under Forms in the left sidebar — drag-and-drop, 4 popup layouts out of the box, 5 display triggers (immediate, after delay, on exit intent, on element click, first visit only), and a one-click way to publish the embed code into a connected website.
This walkthrough shows every panel of the builder and tells you what each setting actually does in production.
Before you start#
- Decide which list new signups will land in. Every form is bound to one list at creation time. If you don't have a list yet, create one in Lists → + New list first — you can't bind a form to a list that doesn't exist.
- Know your minimum fields. AcelleMail's form templates default to Email + First name + Last name + Company + Address + Phone + Web — way too many for a typical signup. Plan to remove what you don't need before publishing.
- A connected website is optional. You can publish a form and grab its HTML embed code without ever connecting a website. The "Connect to website" feature is for hosted/managed sites where AcelleMail can inject the popup script for you.
Step 1 — Open the Forms section#
Click Forms in the left sidebar (under Audience). The URL is /rui/forms.
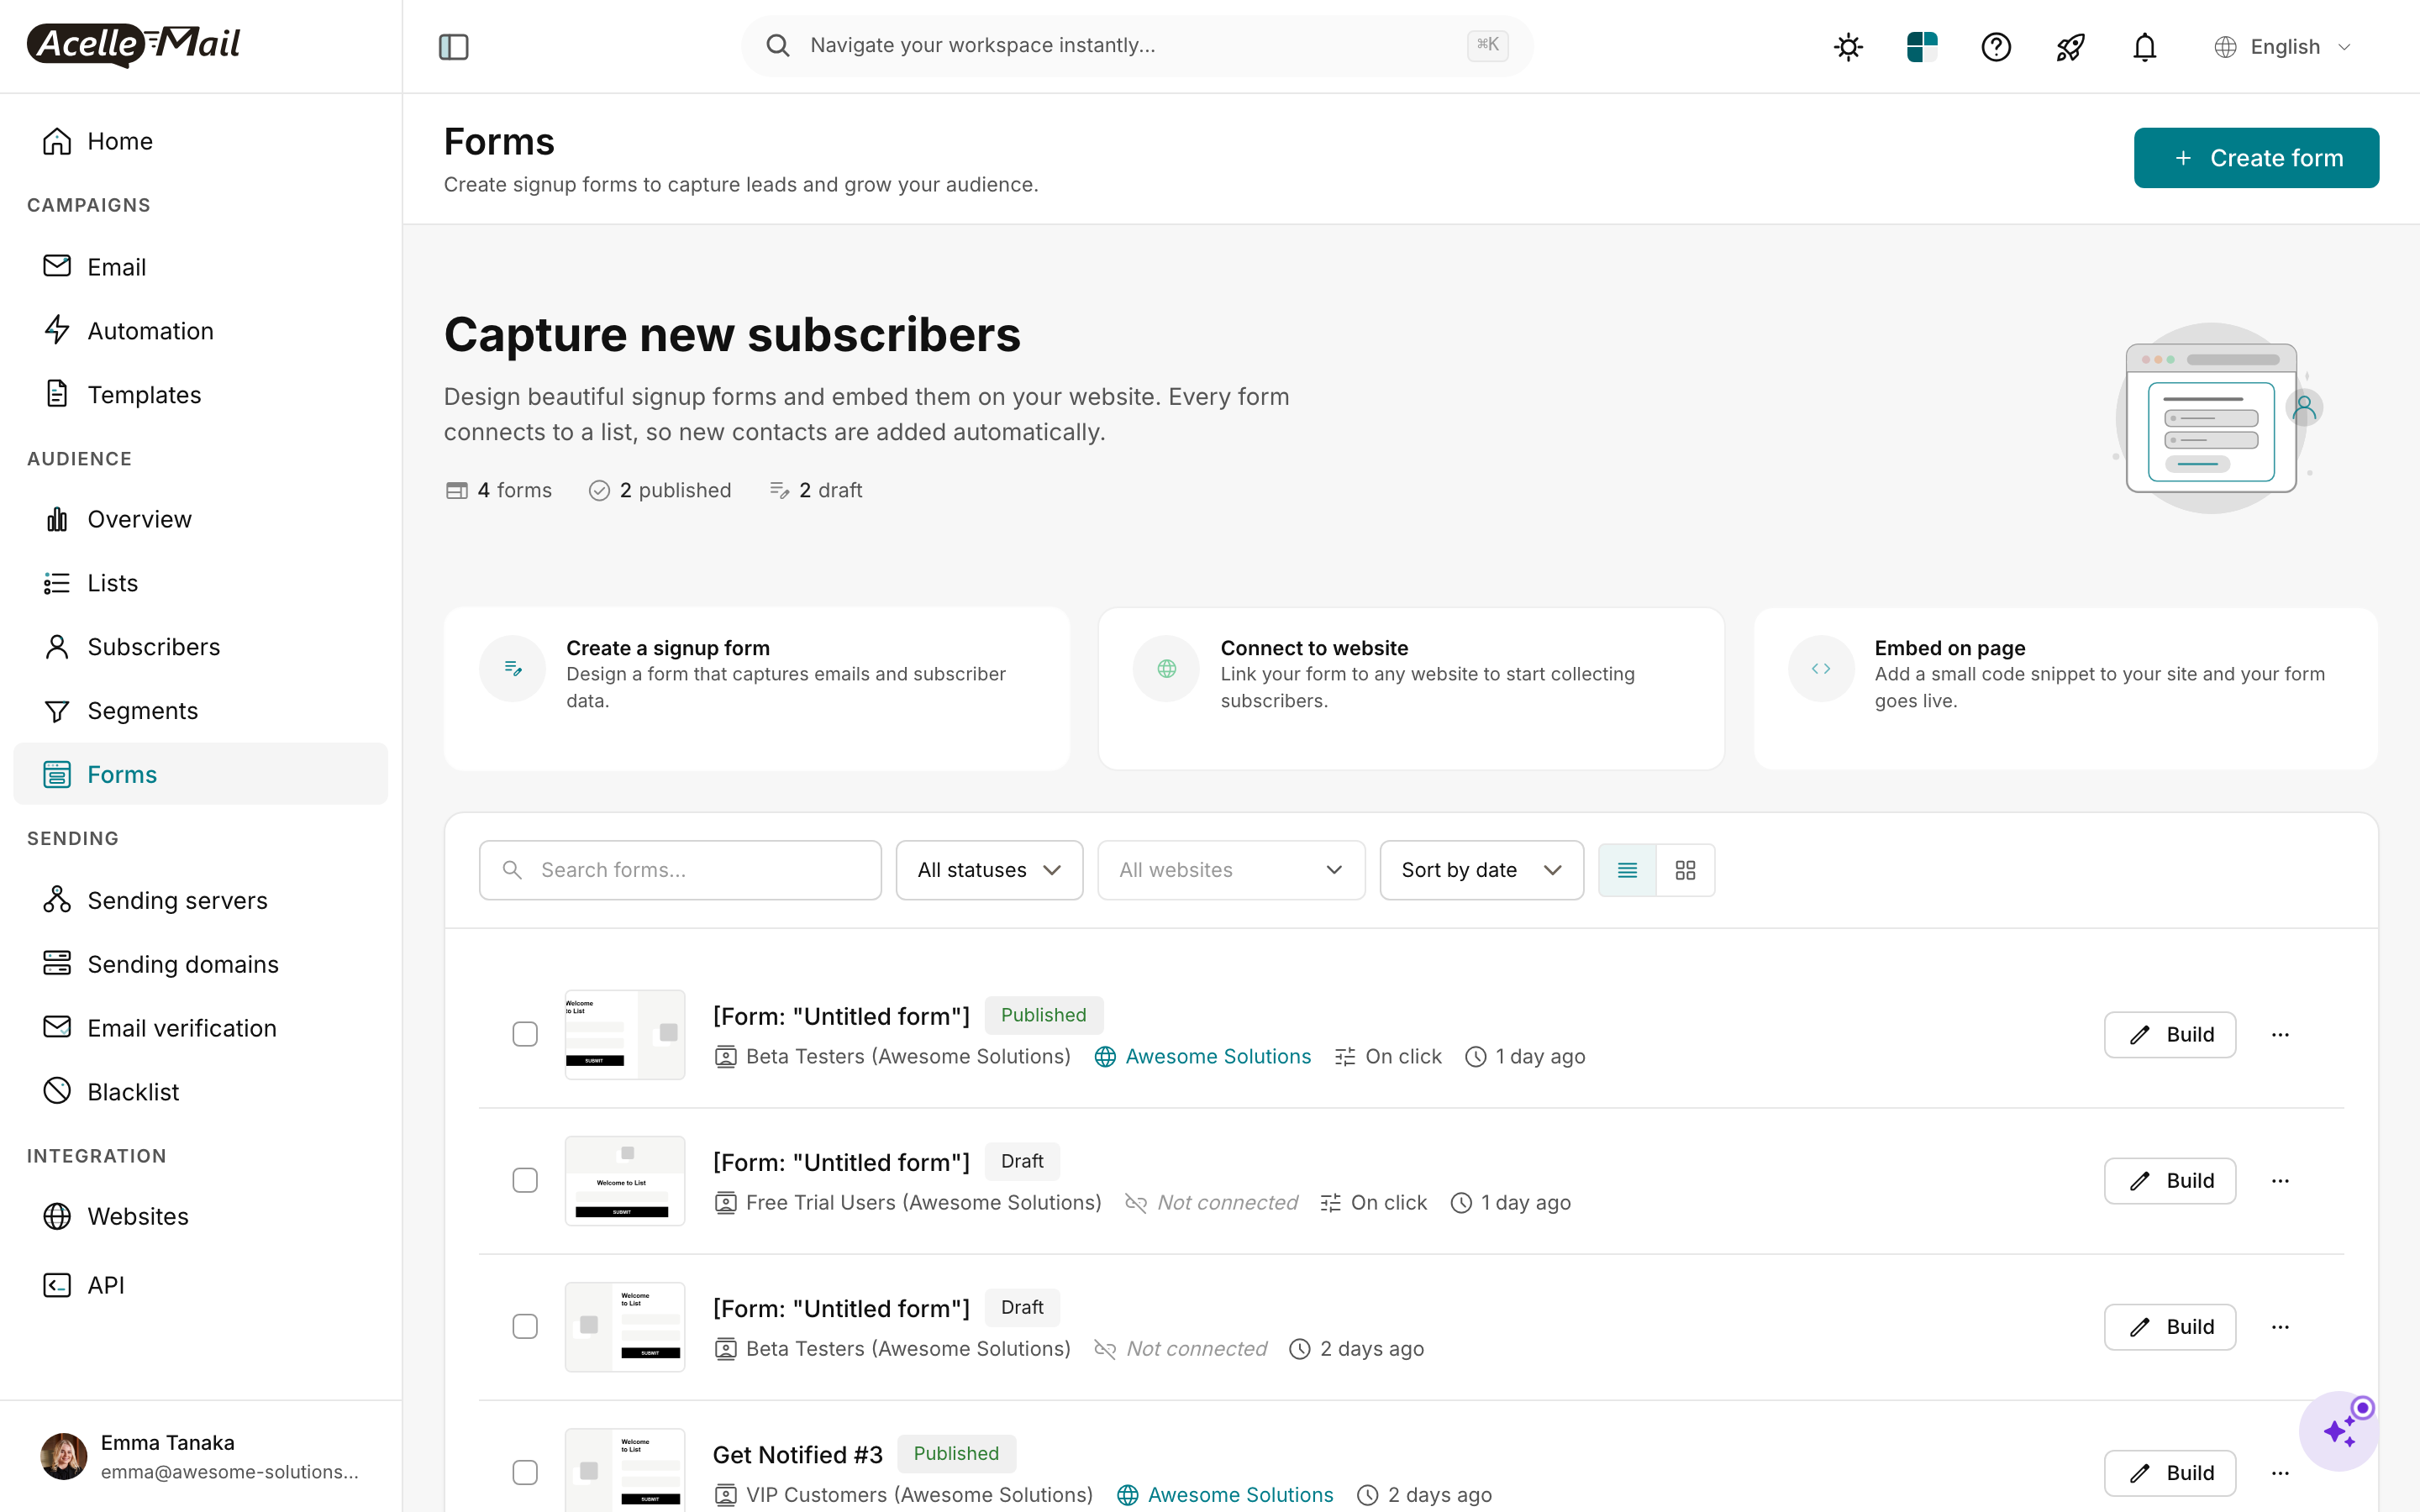
You see three things:
- Three action cards — Create a signup form, Connect to website, Embed on page. These are the same three things you'll do for every new form; the cards just deep-link into each step.
- Stats row — total forms, how many are published vs draft, how many connect to a website.
- Forms table — every form you've created, with its connected list, status (Published / Draft), website connection, and trigger (e.g. On click, Not connected). Each row has a Build button that re-opens the visual editor.
Click the green + Create form button in the top right.
Step 2 — Pick a list and a template#
A modal slides in. AcelleMail asks for the bare minimum it needs before opening the builder.
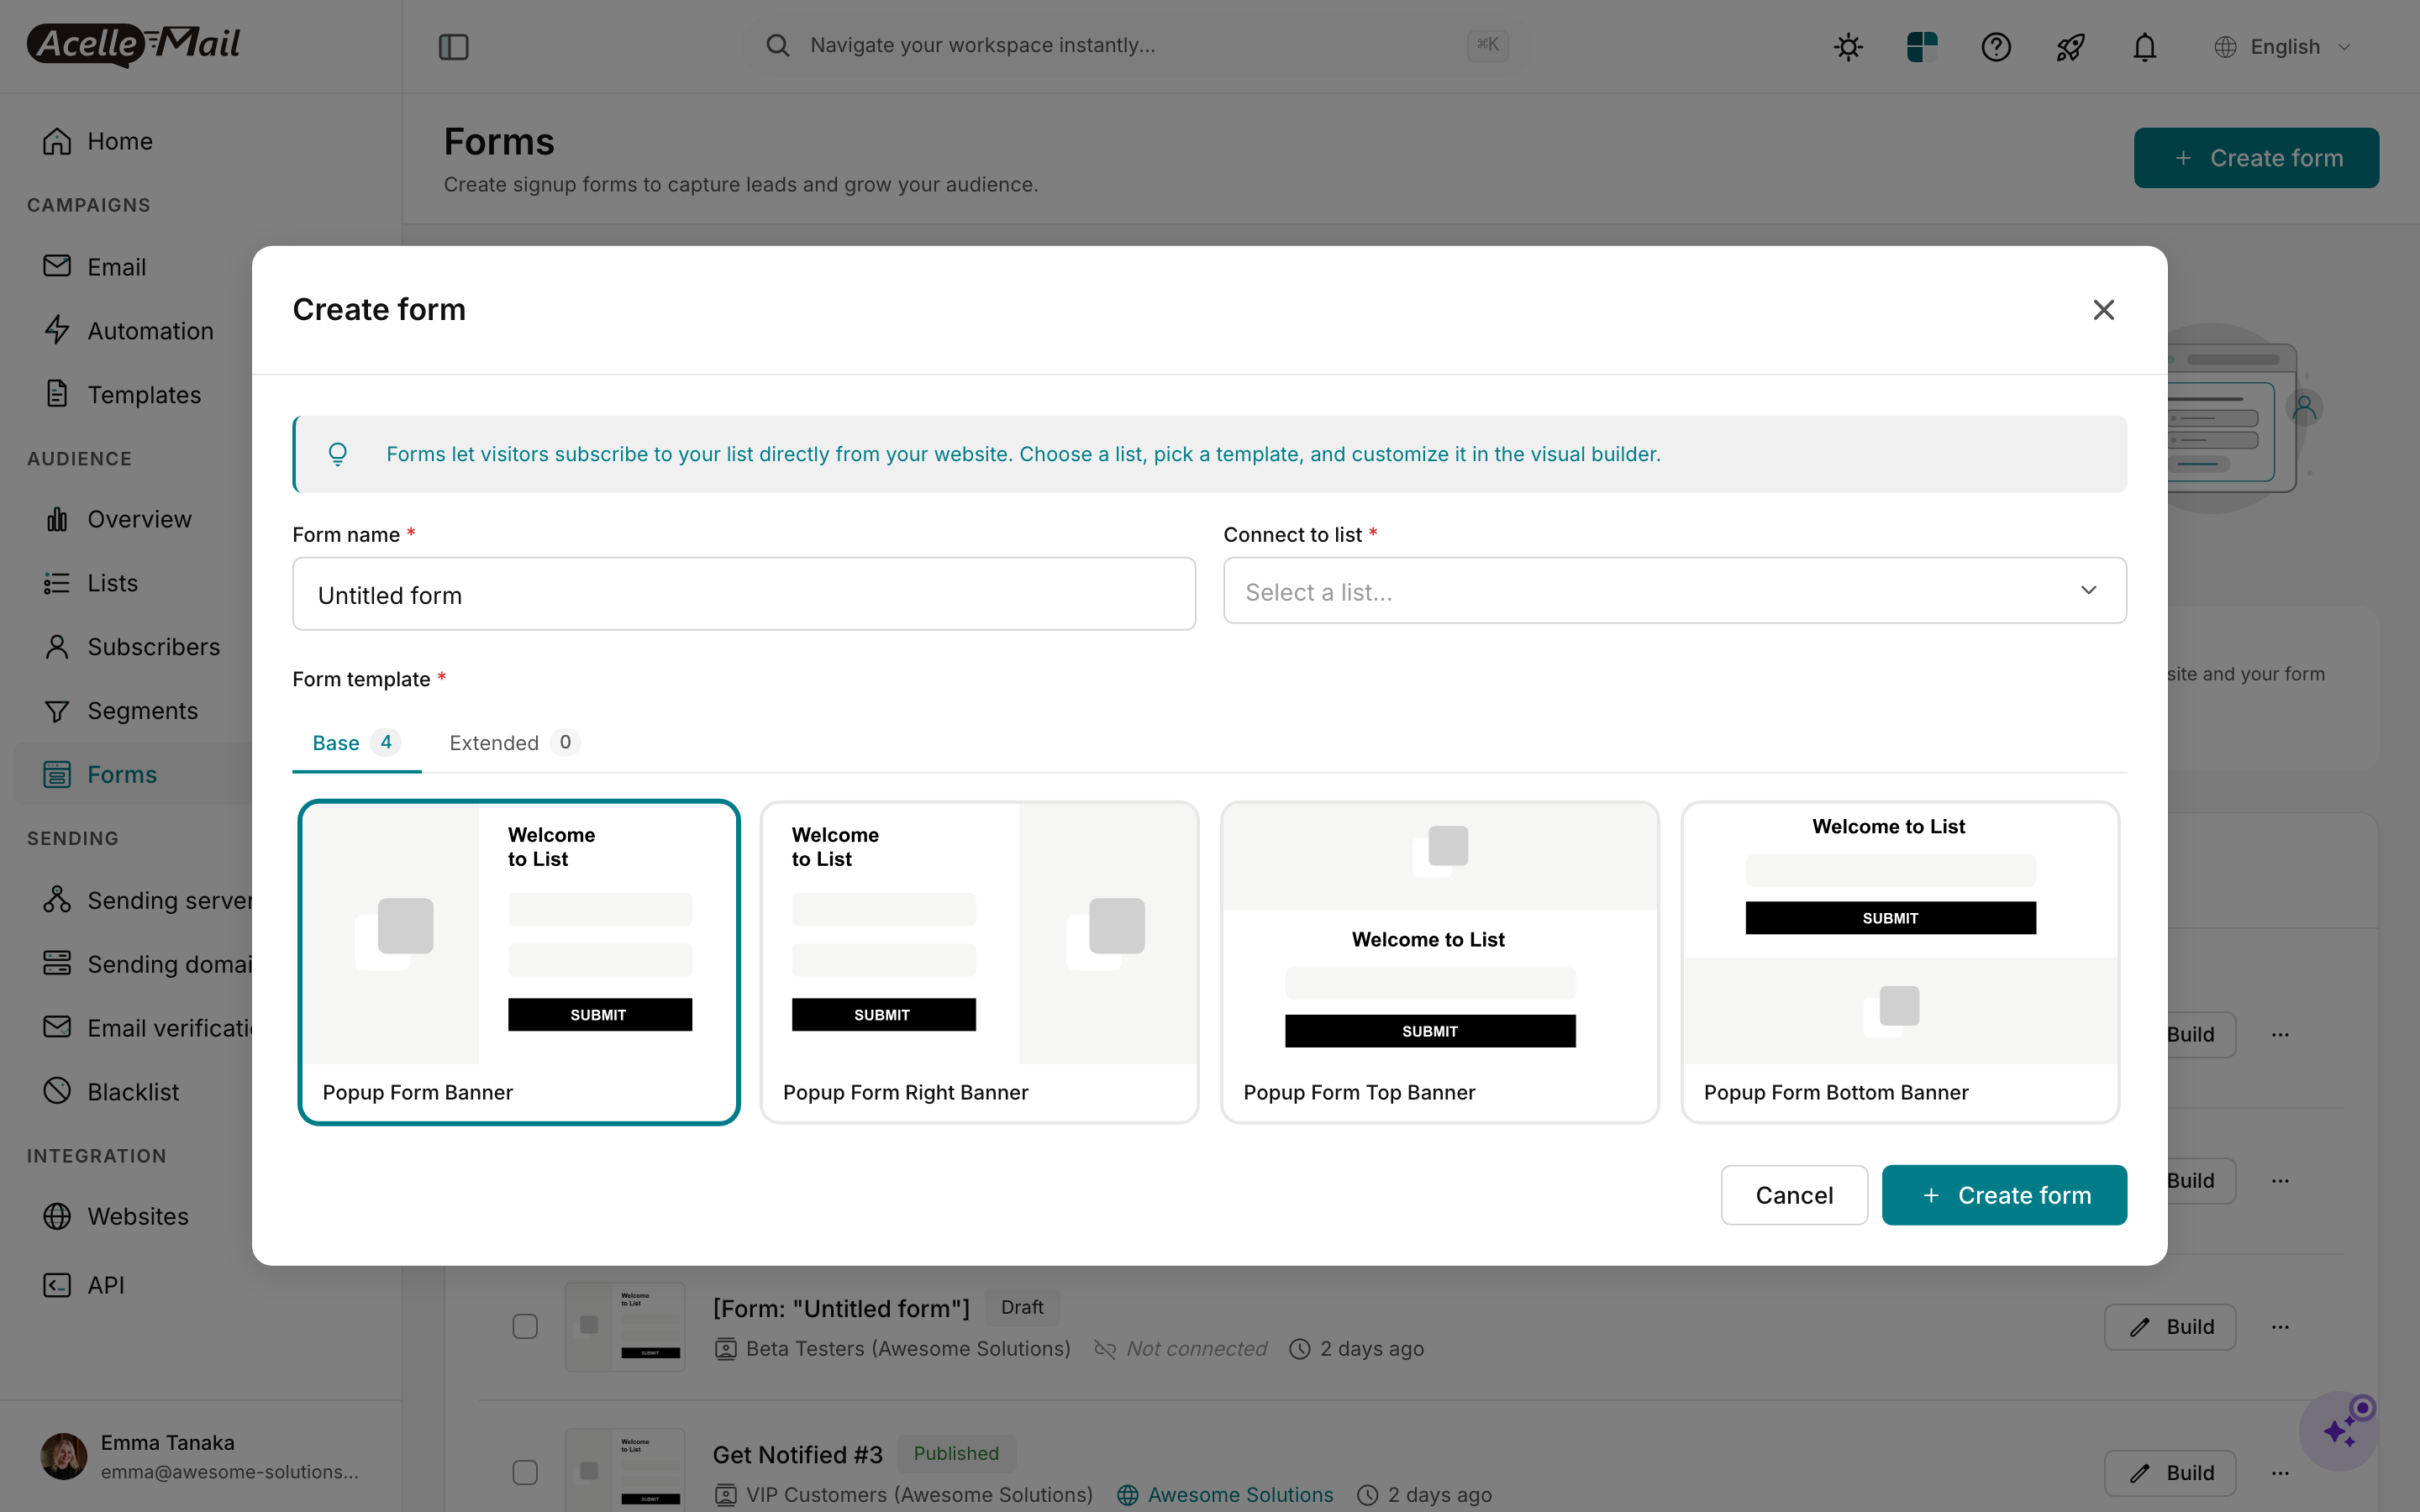
Three fields, in order:
- Form name — what appears in the forms table and in the campaign builder later. Use something concrete like "Homepage hero — newsletter" or "Footer minimal", not the default "Untitled form".
- Connect to list — the mail list that receives new signups. Required. You can change it later in Settings, but new signups before the change land in the original list.
- Form template — there are two tabs: Base (4 popup layouts ship with AcelleMail) and Extended (custom templates your admin creates). The 4 base templates are Popup Form Banner, Popup Form Right Banner, Popup Form Top Banner, and Popup Form Bottom Banner — all variants of where the popup anchors on the page.
Click + Create form. AcelleMail saves a draft and opens the visual builder.
Step 3 — Drag fields onto the canvas#
You land on the builder. There are three things on screen worth knowing.
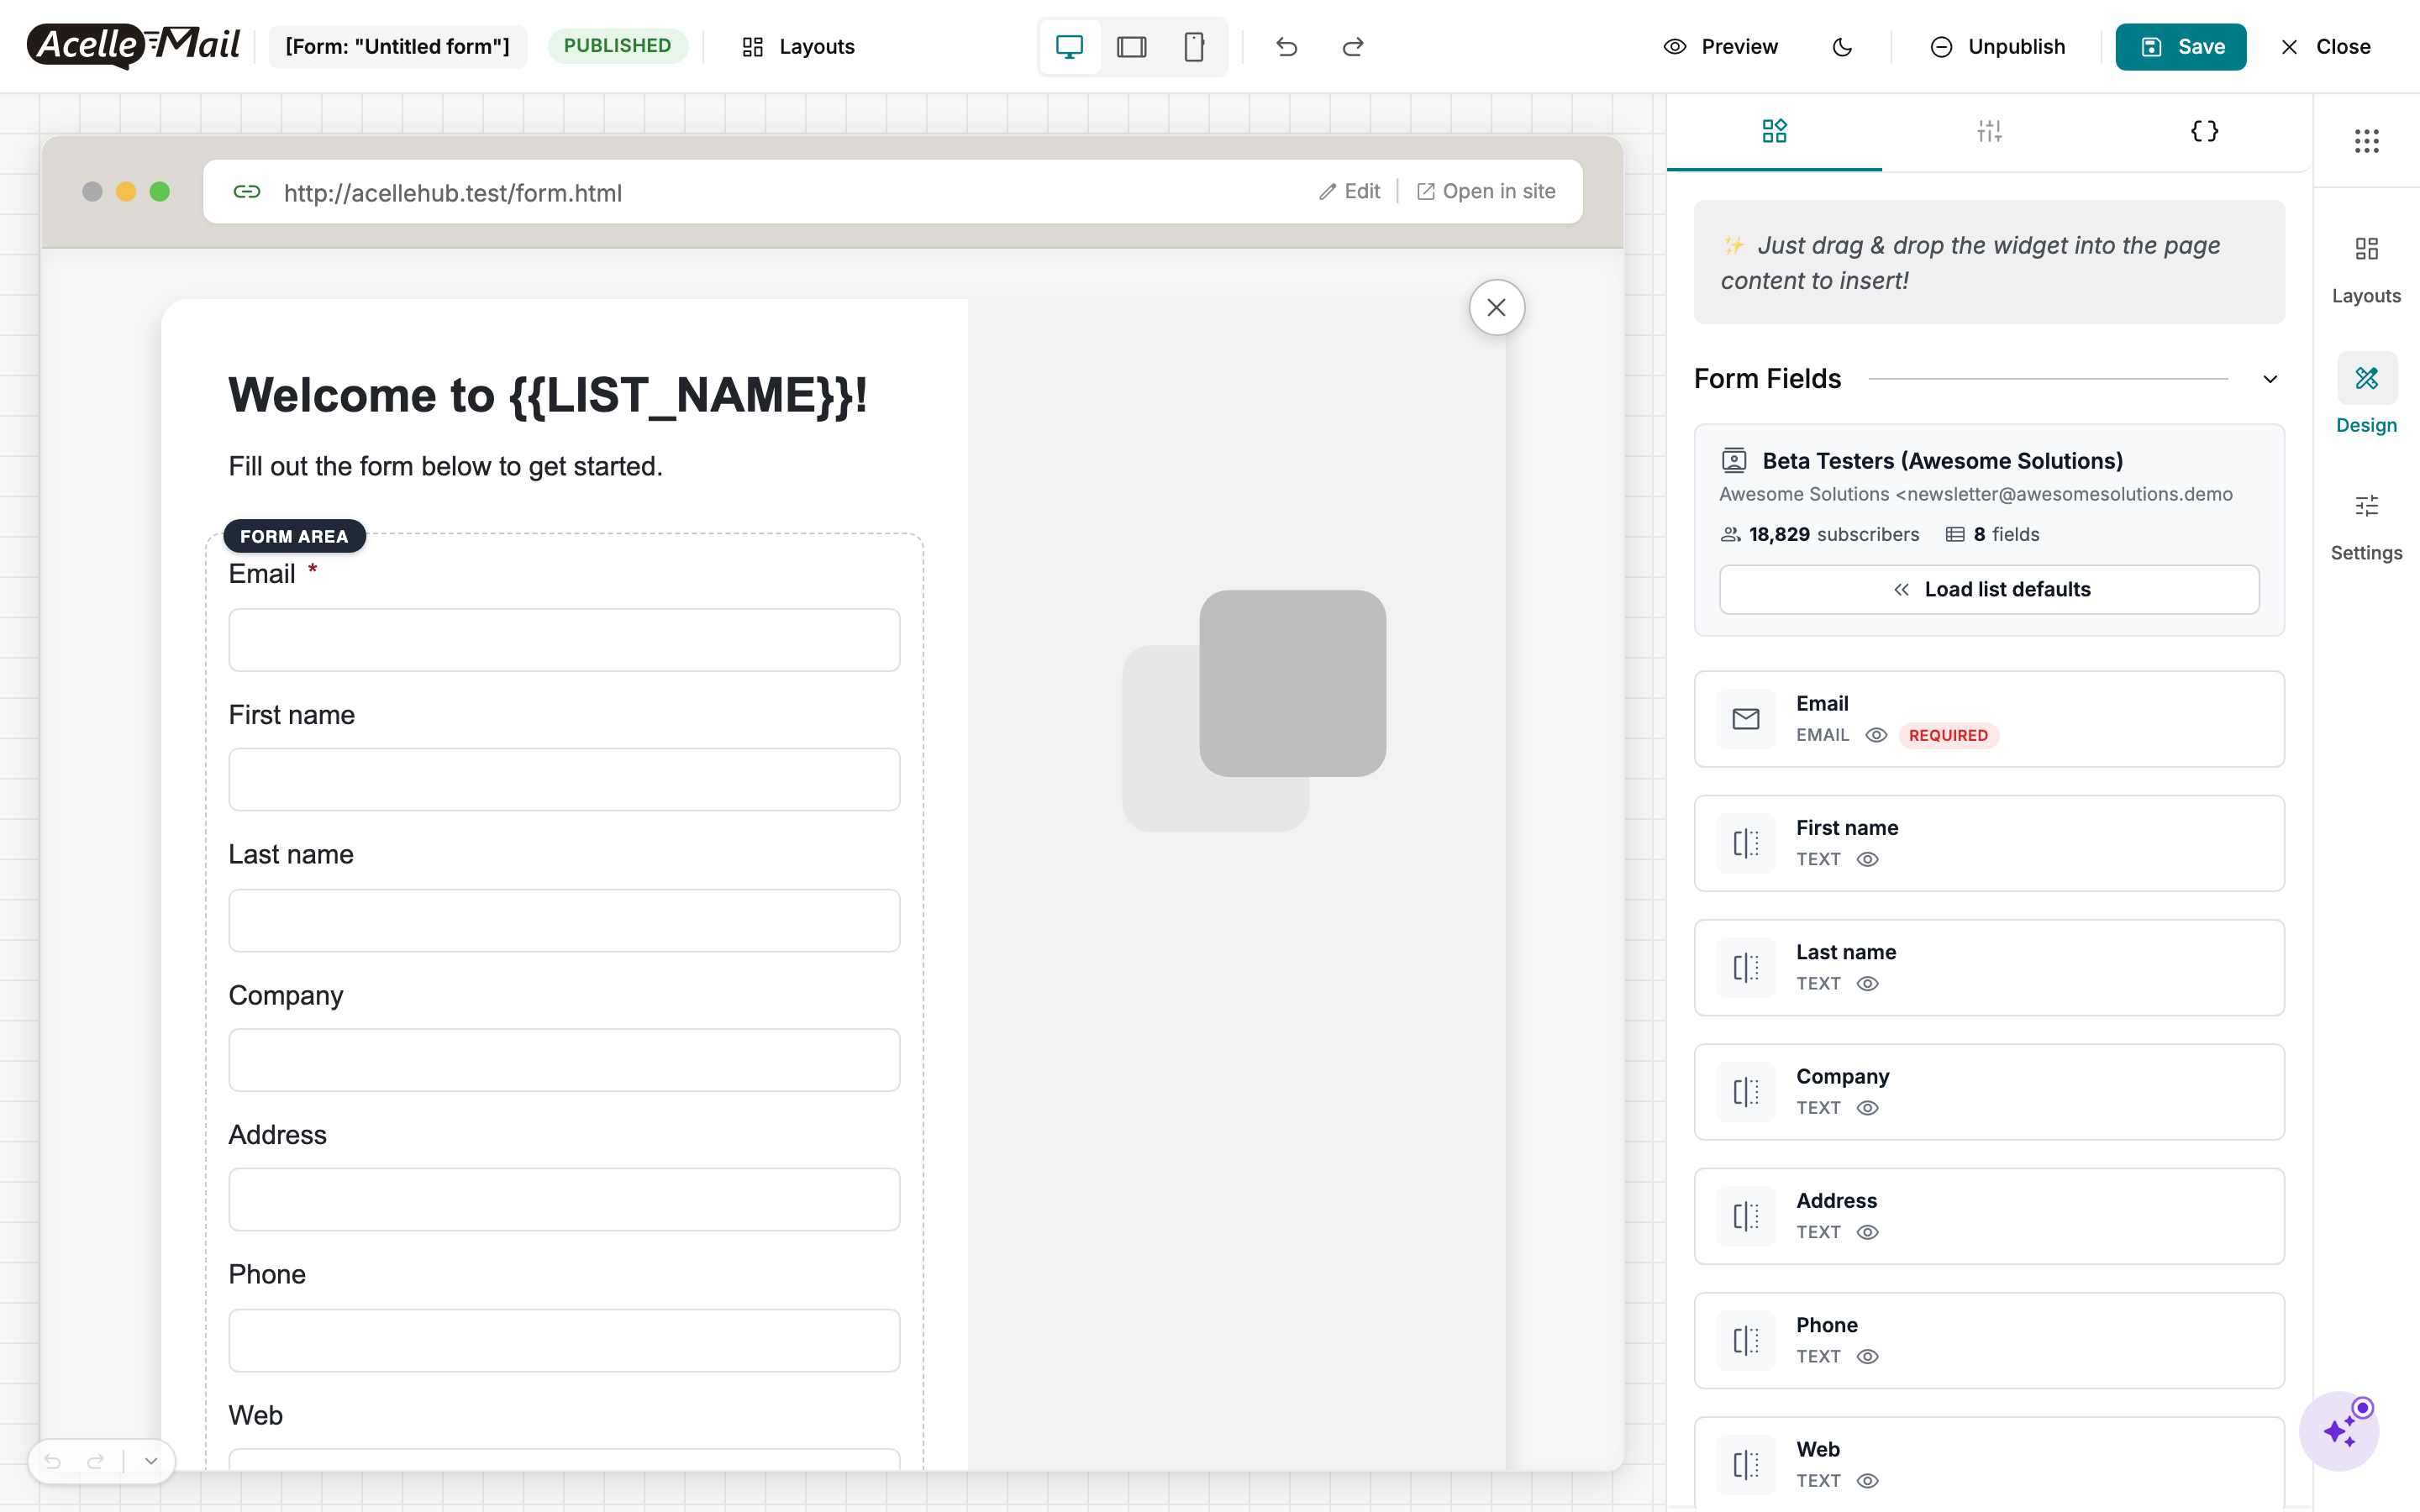
- Live preview in the centre. The browser-mockup chrome shows where the form will sit relative to a real page. Anything you drag from the right panel appears here.
- Form Fields panel on the right. Lists every field on the connected mail list — Email is always required and pre-included. Drag any other field onto the canvas to add it. Drag a field off the canvas to remove it. The Load list defaults button repopulates the canvas with one widget per list field — a fast reset.
- Top bar. From left: form name + status badge (DRAFT / PUBLISHED), responsive previews (desktop / tablet / mobile), undo / redo, Preview, Publish / Unpublish, Save, Close. The tip at the top of the right rail — "Just drag & drop the widget into the page content to insert!" — is the only instruction the builder gives you.
The two things you'll almost always do first:
- Click into the Welcome to {{LIST_NAME}}! heading and rewrite it. The
{{LIST_NAME}} token auto-fills with the connected list's name; replace it if you want fixed copy.
- Drag off fields you don't need (Address, Phone, Web are usually overkill for a newsletter signup). The fewer fields, the higher conversion.
Step 4 — Change the layout (or fine-tune the design)#
The right rail has three vertical tabs: Layouts, Design, Settings. Click Layouts to switch the popup's anchor position without losing your field work.
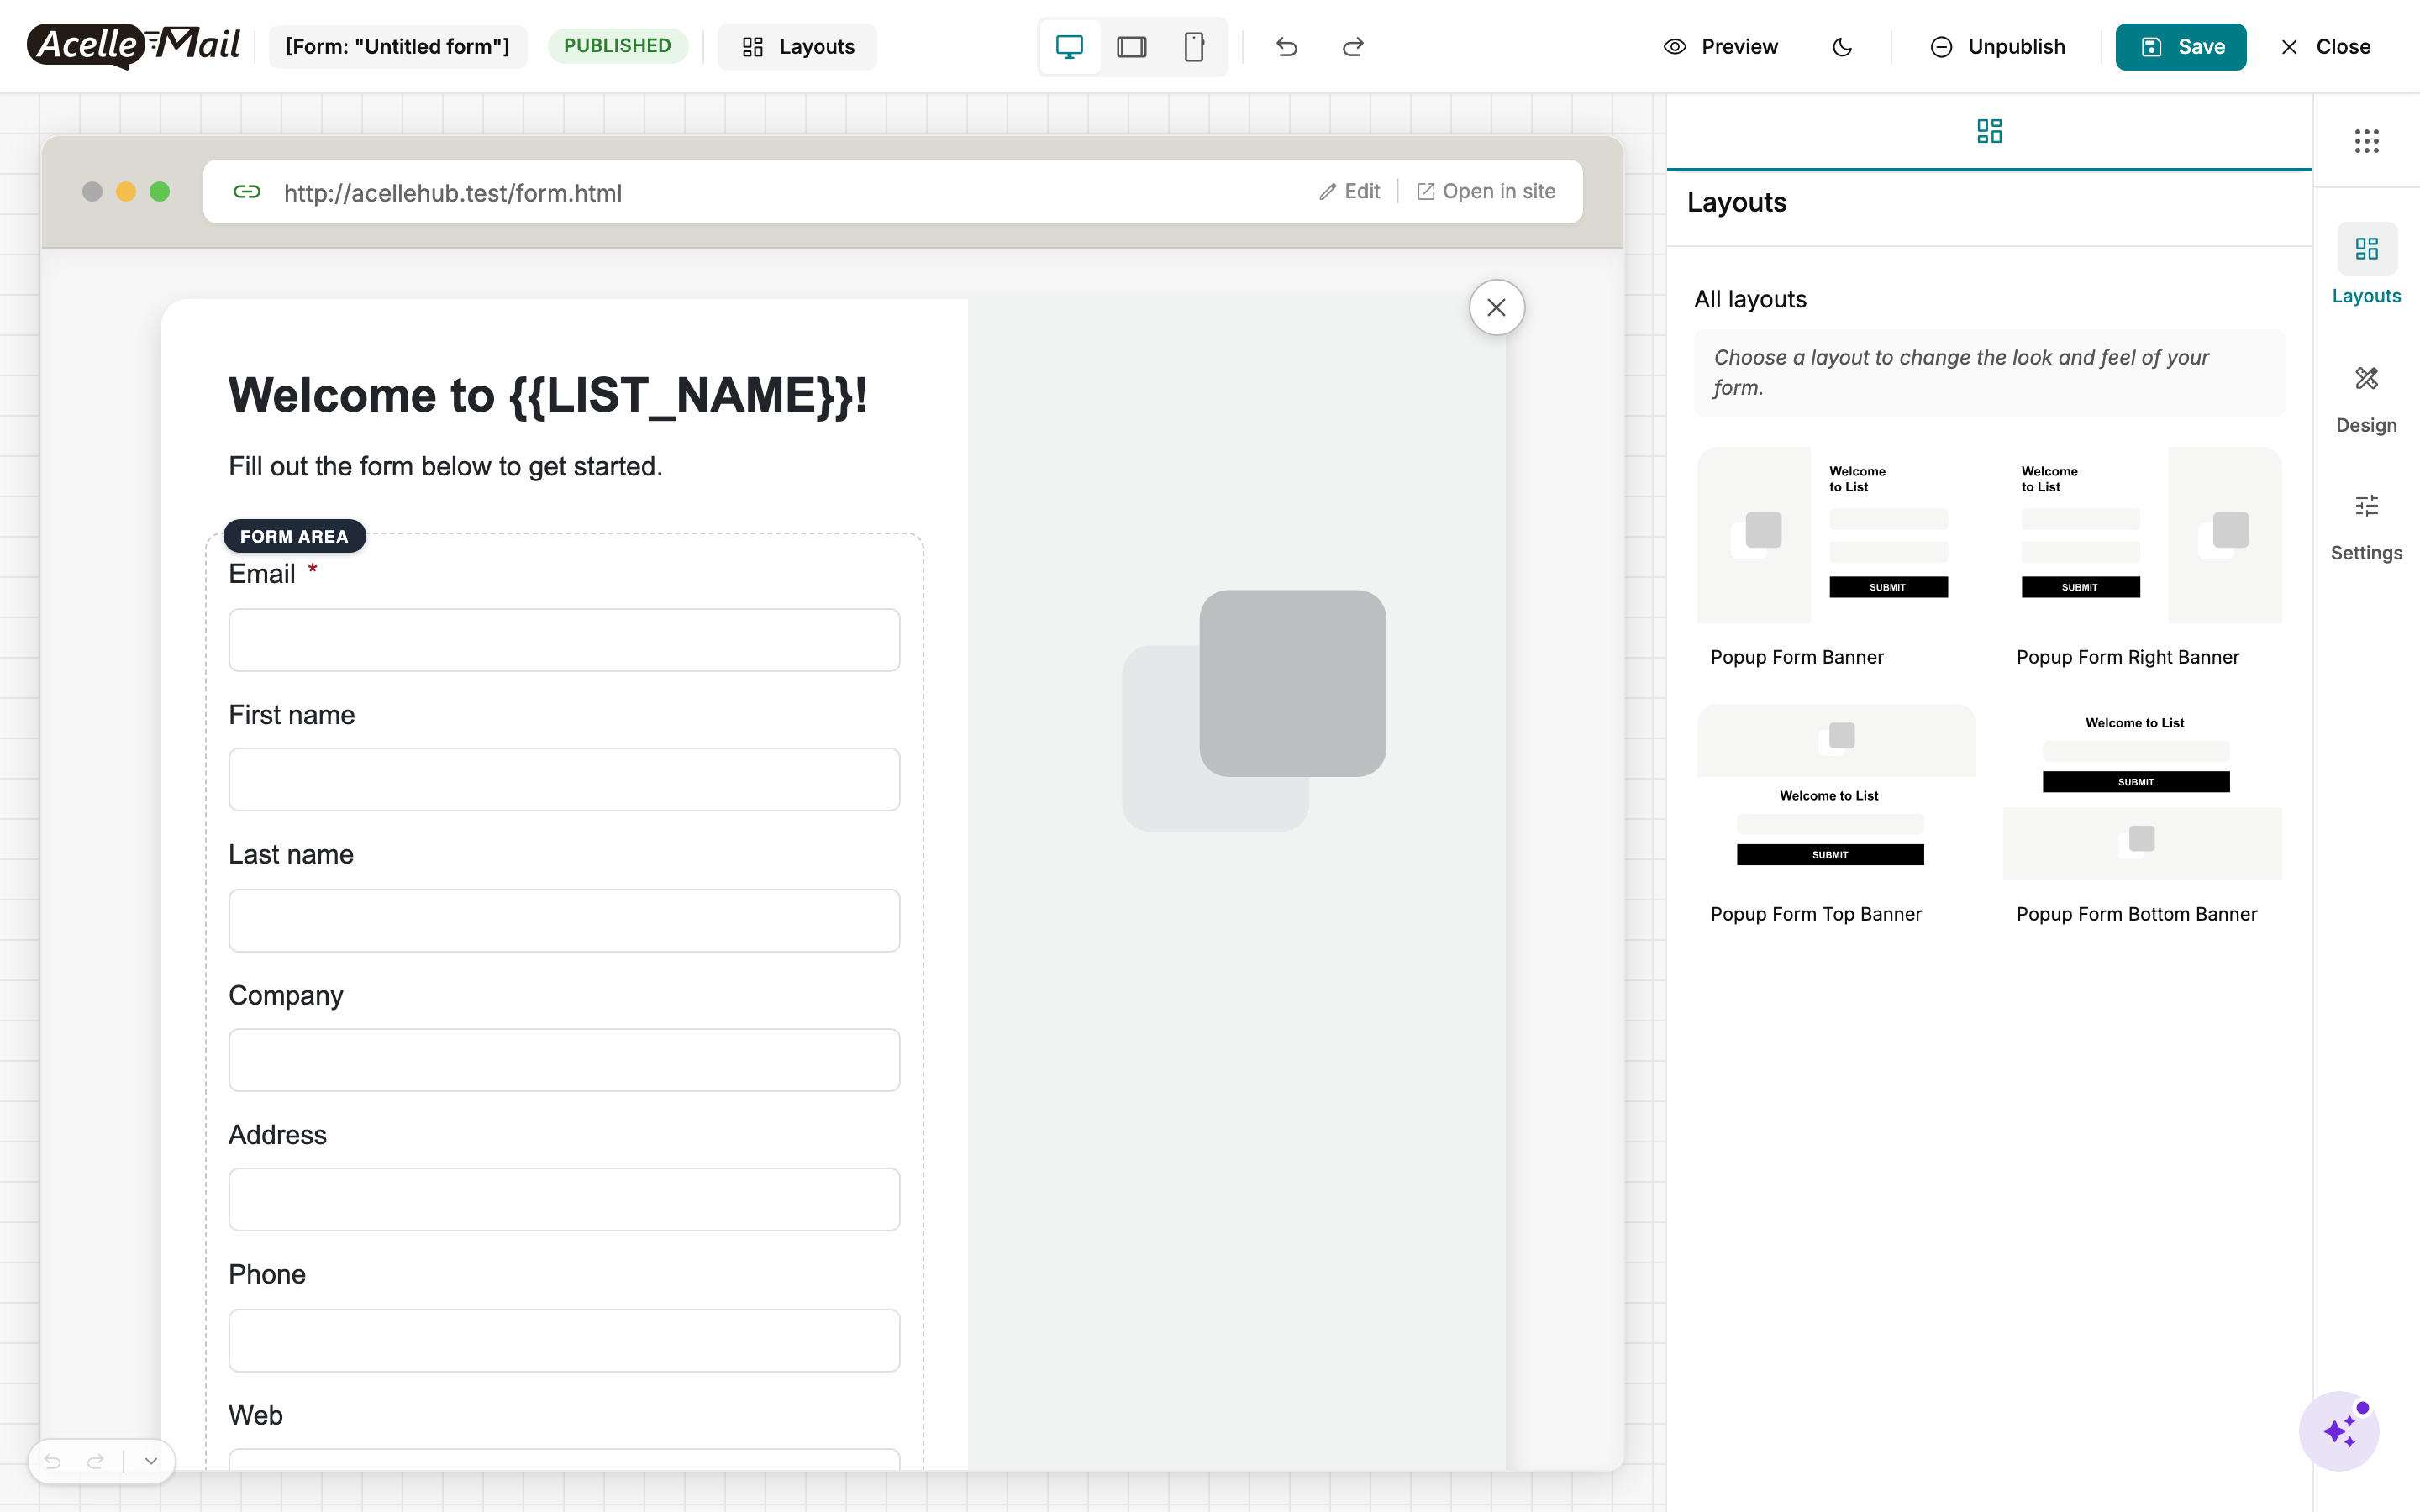
The 4 layouts are different anchor positions:
| Layout |
Where the popup appears |
Typical use |
| Popup Form Banner |
Centred modal overlay |
First-visit lead magnets |
| Popup Form Right Banner |
Anchored to the right edge |
Slide-in offers (less intrusive) |
| Popup Form Top Banner |
Pinned to the top of the page |
Announcement strips |
| Popup Form Bottom Banner |
Pinned to the bottom |
Cookie-bar-style sign-ups |
Swap layouts at any time — your field work carries over. Design is the middle tab and gives you finer control over fonts, colours, and spacing.
Don't forget to preview narrow viewports — click the mobile icon in the top bar.
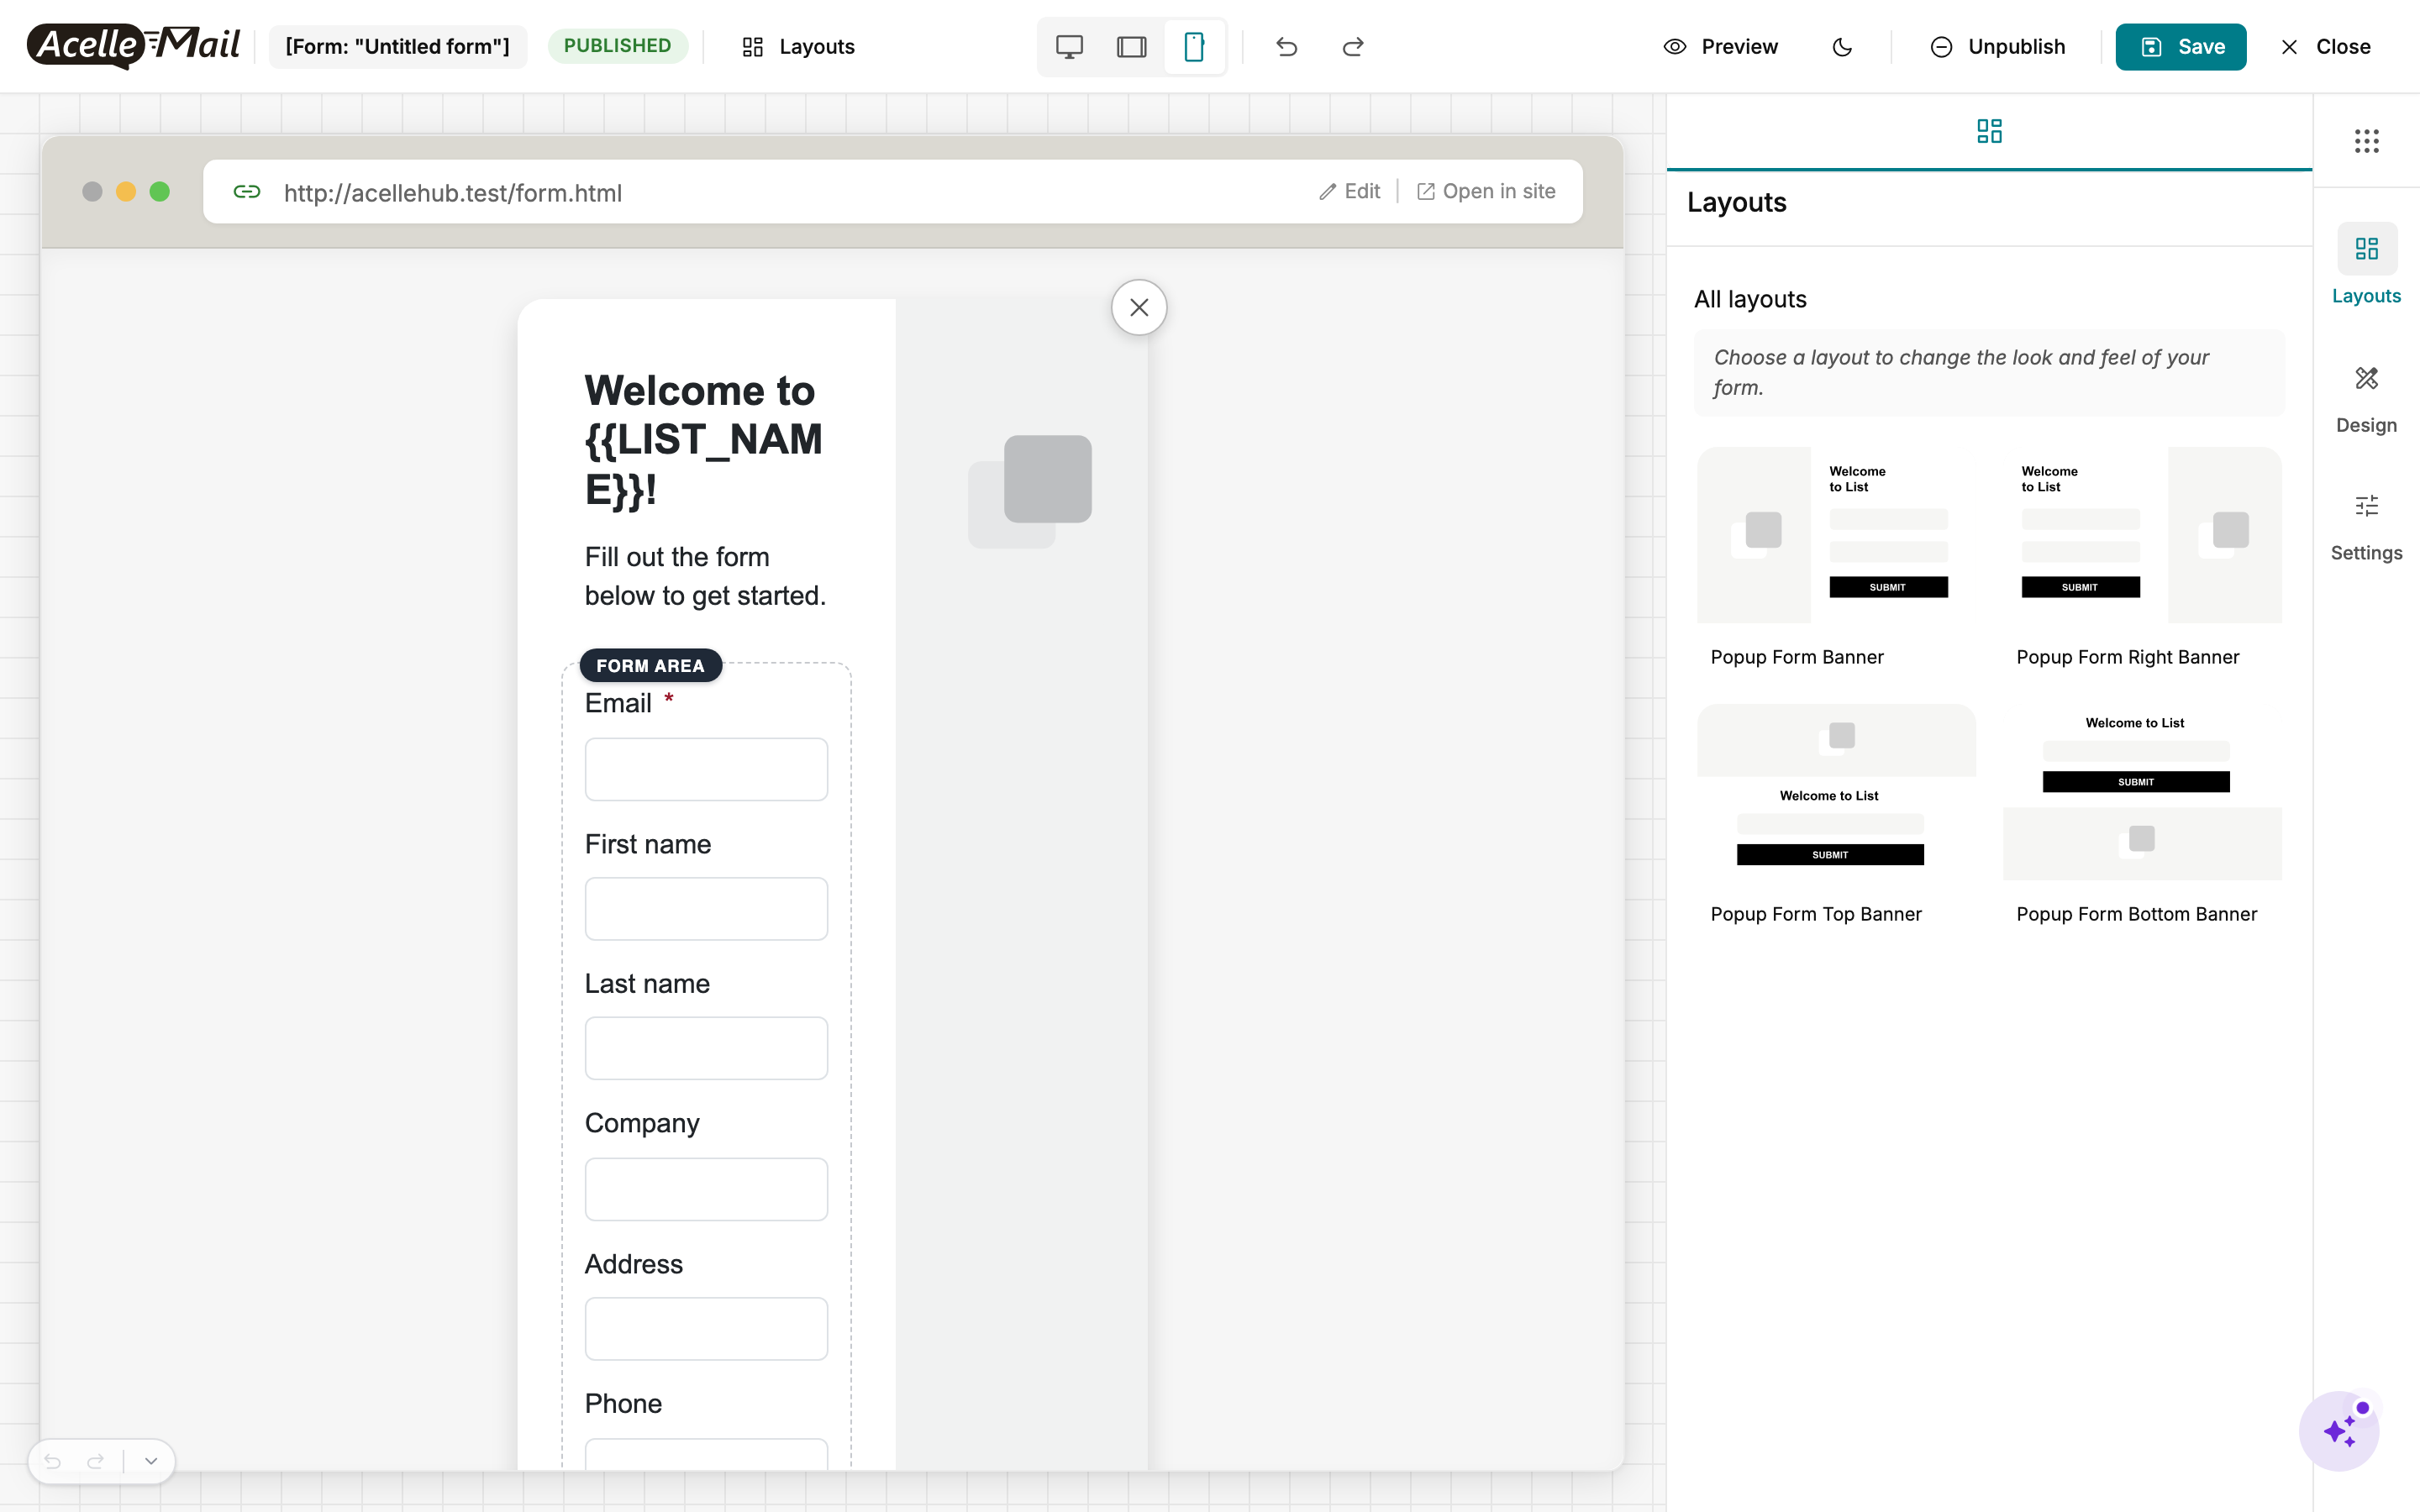
Always check mobile before publishing. The default Base templates are responsive, but custom layouts and long field labels can wrap badly on narrow screens.
Step 5 — Configure when the popup fires
Click the Settings tab on the right rail. This is the most important panel for popup forms — it controls when the form appears to visitors.
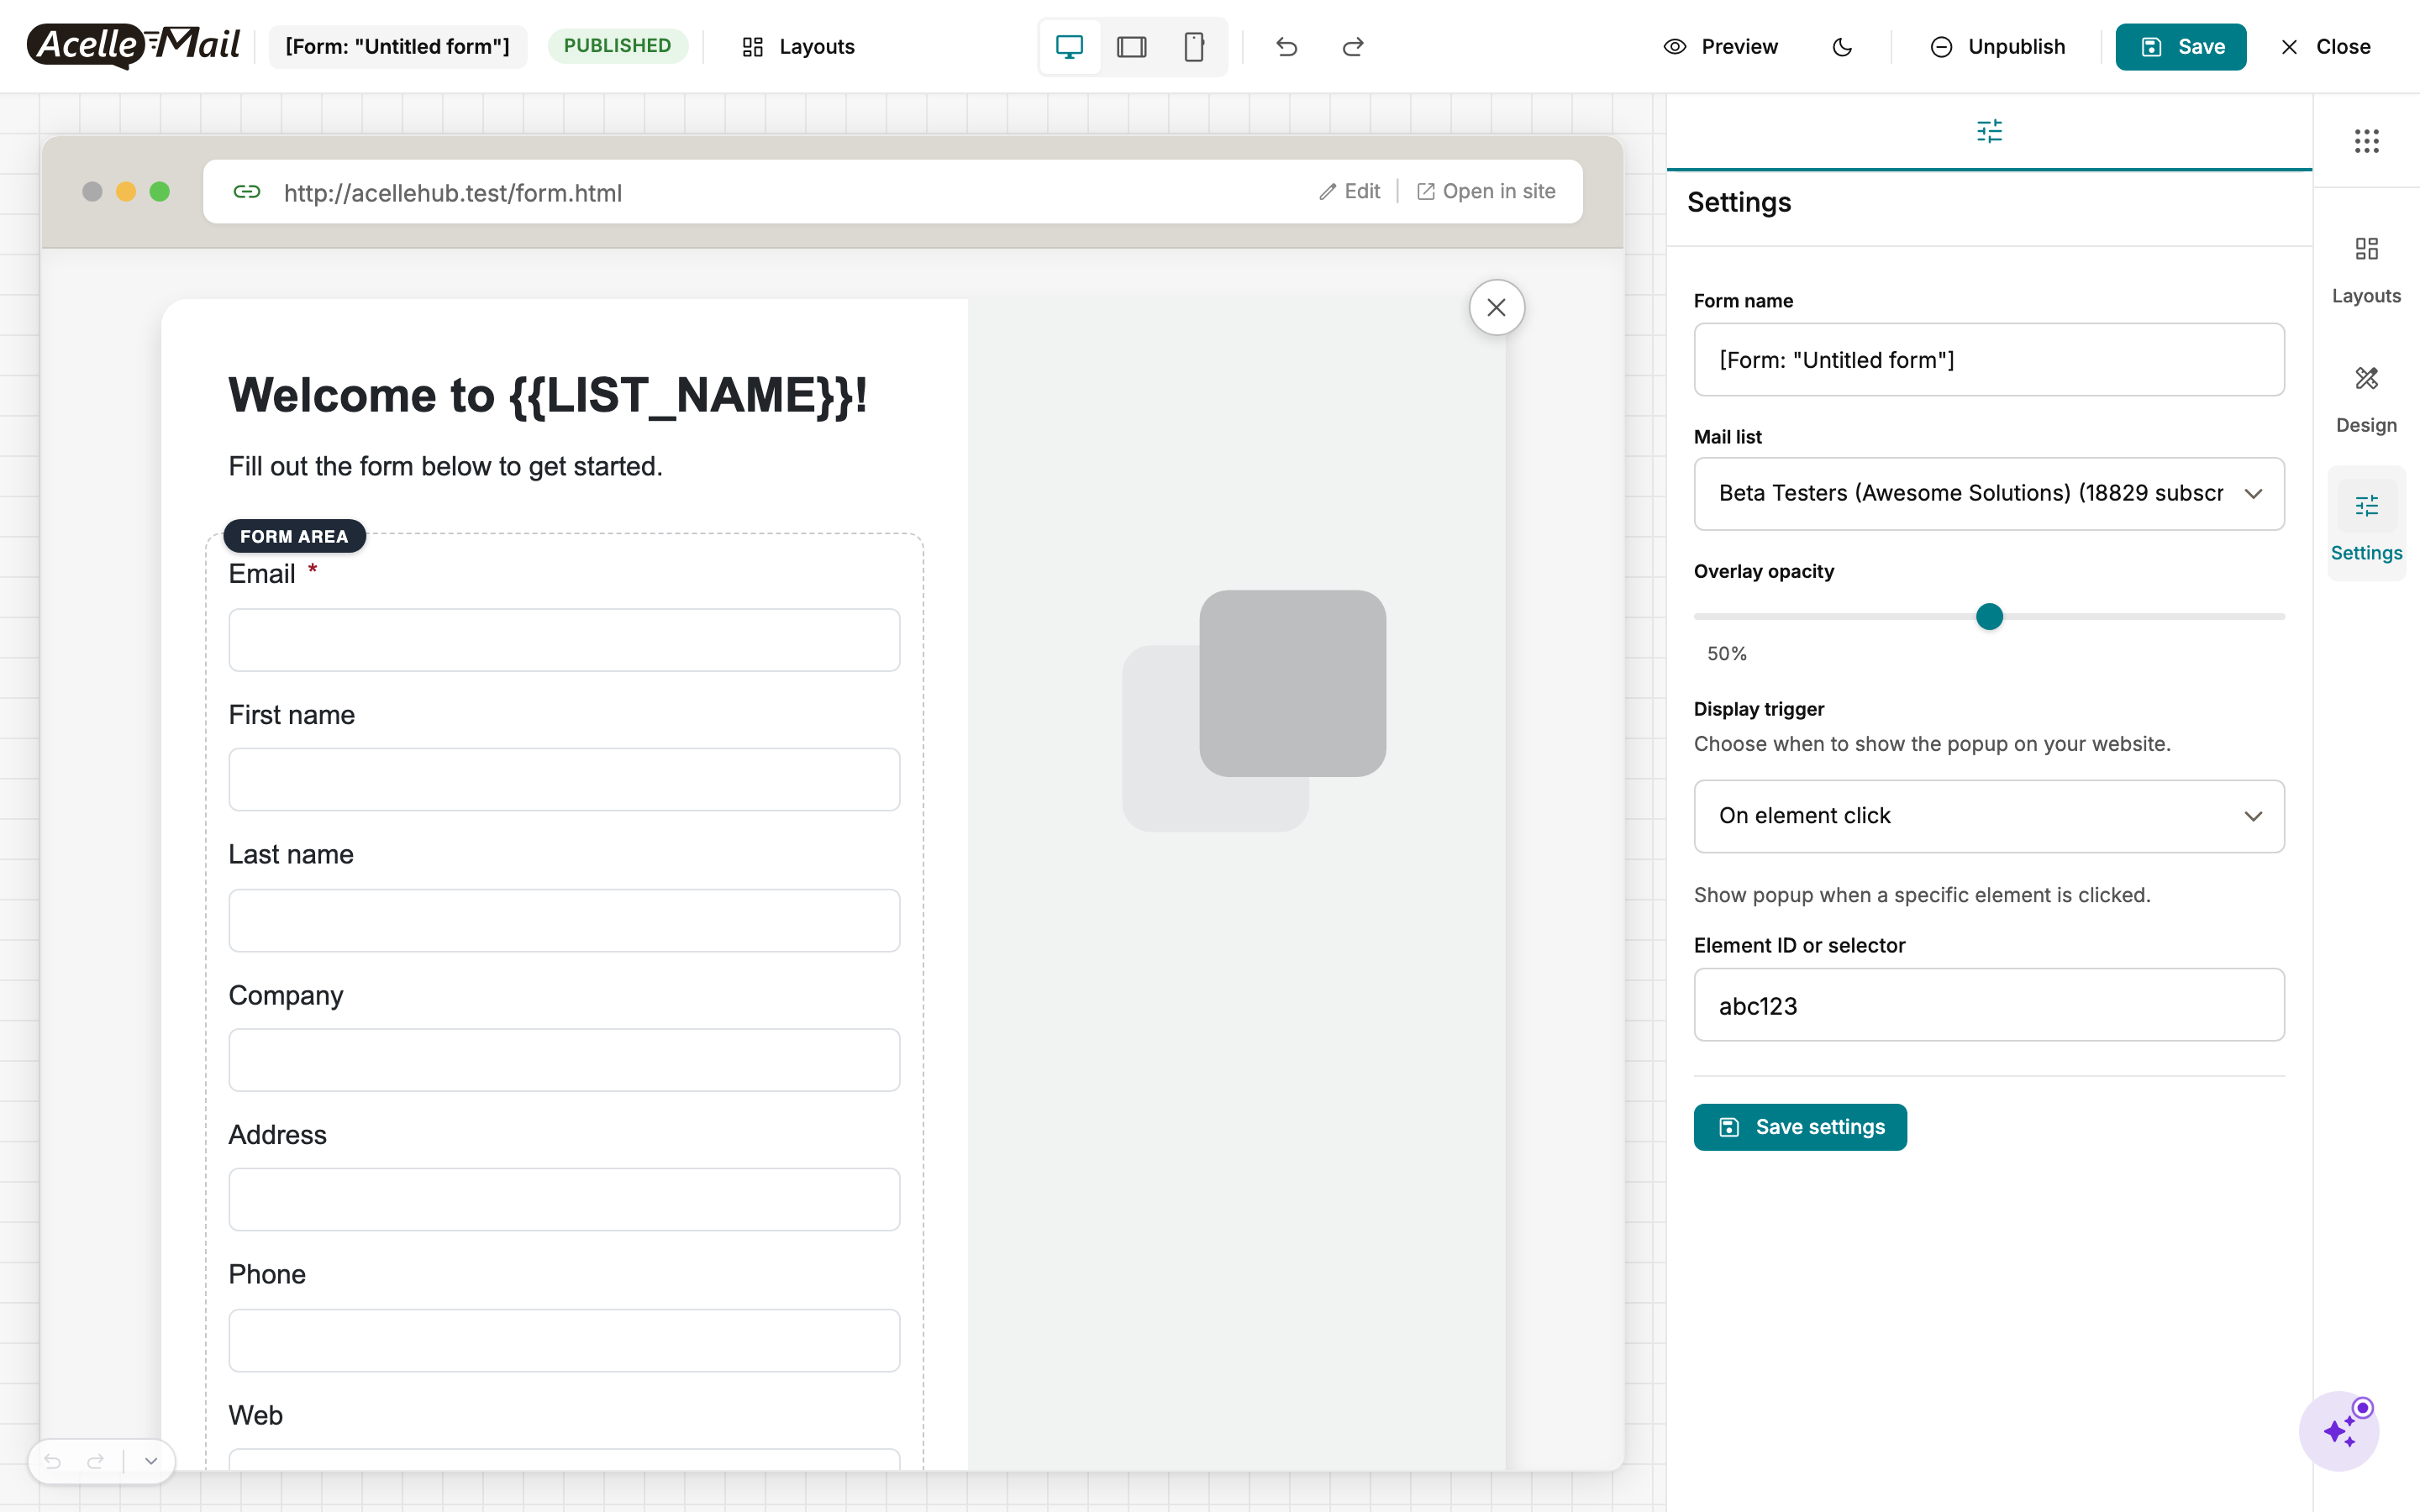
What each setting does:
- Form name — change it any time, no signups affected.
- Mail list — swap which list receives new signups. New submissions after the save go to the new list; existing signups stay in their original list.
- Overlay opacity — only relevant for the centred Popup Form Banner layout. 0% = transparent background; 100% = fully black overlay. 40–60% is the typical sweet spot.
- Display trigger — the heart of the popup. Five options:
| Trigger |
What happens |
When to use |
| Immediately |
Popup shows on page load |
Lead-magnet landing pages where the offer IS the page |
| After delay |
Wait N seconds (you pick) |
Lets visitors see your content before being asked to subscribe |
| On exit intent |
Mouse leaves the viewport |
Cart abandonment, last-chance offers — desktop-only |
| On element click |
When a specific element (by ID or CSS selector) is clicked |
"Subscribe" links scattered across your site that all open the same popup |
| First visit only |
Cookie-based — popup shows once per browser |
Aggressive lead-gen without annoying returning visitors |
When you pick On element click, an extra Element ID or selector input appears — paste the element ID (abc123 for id="abc123") or any valid CSS selector (.subscribe-link).
Click Save settings when you're done. Settings are not part of the canvas — they save independently from your design.
Step 6 — Preview, publish, and embed#
When the form is ready:
- Click Preview in the top bar — opens a real rendered version in a new tab. Click around as if you were a visitor.
- Click Publish. The status badge switches from DRAFT to PUBLISHED, and AcelleMail makes the form's URL + embed snippet available.
- To embed on your own site: from the forms list, click the form's row menu → Embed on page. AcelleMail gives you a small script tag to paste before the closing
</body> of your website. The popup will fire according to the trigger you set in Step 5.
- To connect a managed website: if you have a website registered in Integration → Websites, the Connect to website card on the Forms index links the form's popup directly to that site — no manual embedding required.
Unpublishing a form takes it off your connected websites immediately; the form URL also stops accepting new subscribers.
Common issues#
| What you see |
What to do |
| Popup never appears on the website |
The form is still in Draft. Open the form in the builder and click Publish — the badge must say PUBLISHED. |
| Popup appears on every page load even though you set "First visit only" |
Cookie-based throttling can be defeated by Incognito mode or cookie clears. Test in a regular profile. |
| Submissions land in the wrong list |
You changed the Mail list in Settings AFTER subscribers signed up. The change is only forward-looking — historical signups stay in the original list. |
| Mobile users see fields cut off |
Switch to the mobile preview in the top bar and shorten field labels or remove non-essential fields. The Base templates are responsive, but long custom labels overflow on phones. |
| "Connect to website" shows no options |
You haven't registered a website yet. Go to Integration → Websites and add one. Otherwise just use the manual embed snippet. |
| Embed code does nothing on the live site |
Most common cause: it was pasted in the <head> before the page loaded. Move it just before </body>, OR wrap it in DOMContentLoaded. |
| "Untitled form" entries pile up |
You opened the builder and closed without renaming. Delete them from the forms list — they're not connected to anything until you Publish. |
After your form is live#
- Watch subscriber growth on the connected list. Open the list, look at the Overview tab — Subscribers count should tick up after your first day live.
- Trigger one welcome automation per list. A signup form that just stuffs people into a list and never emails them is a wasted opportunity. Build a 3-step welcome series under Automation that fires On new subscriber.
- A/B test the trigger. Try Immediately vs After delay 30s vs On exit intent — different audiences respond differently to interruption.
- Audit empty submissions. If the form had an Address field and 90% of submissions left it blank, drop the field. Every field is a tax on conversion.
Related articles#
