What this is for#
AcelleMail makes the single-vs-double opt-in choice into one toggle, per list. This article shows you exactly where the toggle lives, what changes when you flip it on, and a buyer-focused decision guide so you can make the call without wading through compliance theory first.
Short answer for most readers: turn it on, especially if you have any EU / UK / Canadian subscribers or if you import a list from outside AcelleMail. Skip ahead to Step 1 for the click path.
What changes when you flip the toggle#
| With Double opt-in OFF (single) |
With Double opt-in ON |
| Subscriber's status becomes Subscribed the moment they submit the signup form |
Status becomes Unconfirmed on submission; flips to Subscribed only after they click the confirmation link |
| They start receiving campaigns immediately |
They receive only the confirmation email until they click |
| You have no per-subscriber timestamped proof of consent |
The confirmation click is a timestamped, IP-logged consent event (legible under GDPR / CASL / PECR) |
| Typo emails and bots silently inflate your list |
Typo emails and bots never confirm, so they never enter the marketing list |
Nothing else changes. The Subscribed status flow, segments, and campaigns are identical — DOI just gates when a subscriber becomes Subscribed.
Step 1 — Open the list's Settings tab#
In the left sidebar click Lists, open the list you want to configure, and switch to the Settings tab in the list's top navigation. The URL is /rui/lists/<list-uid>/edit.
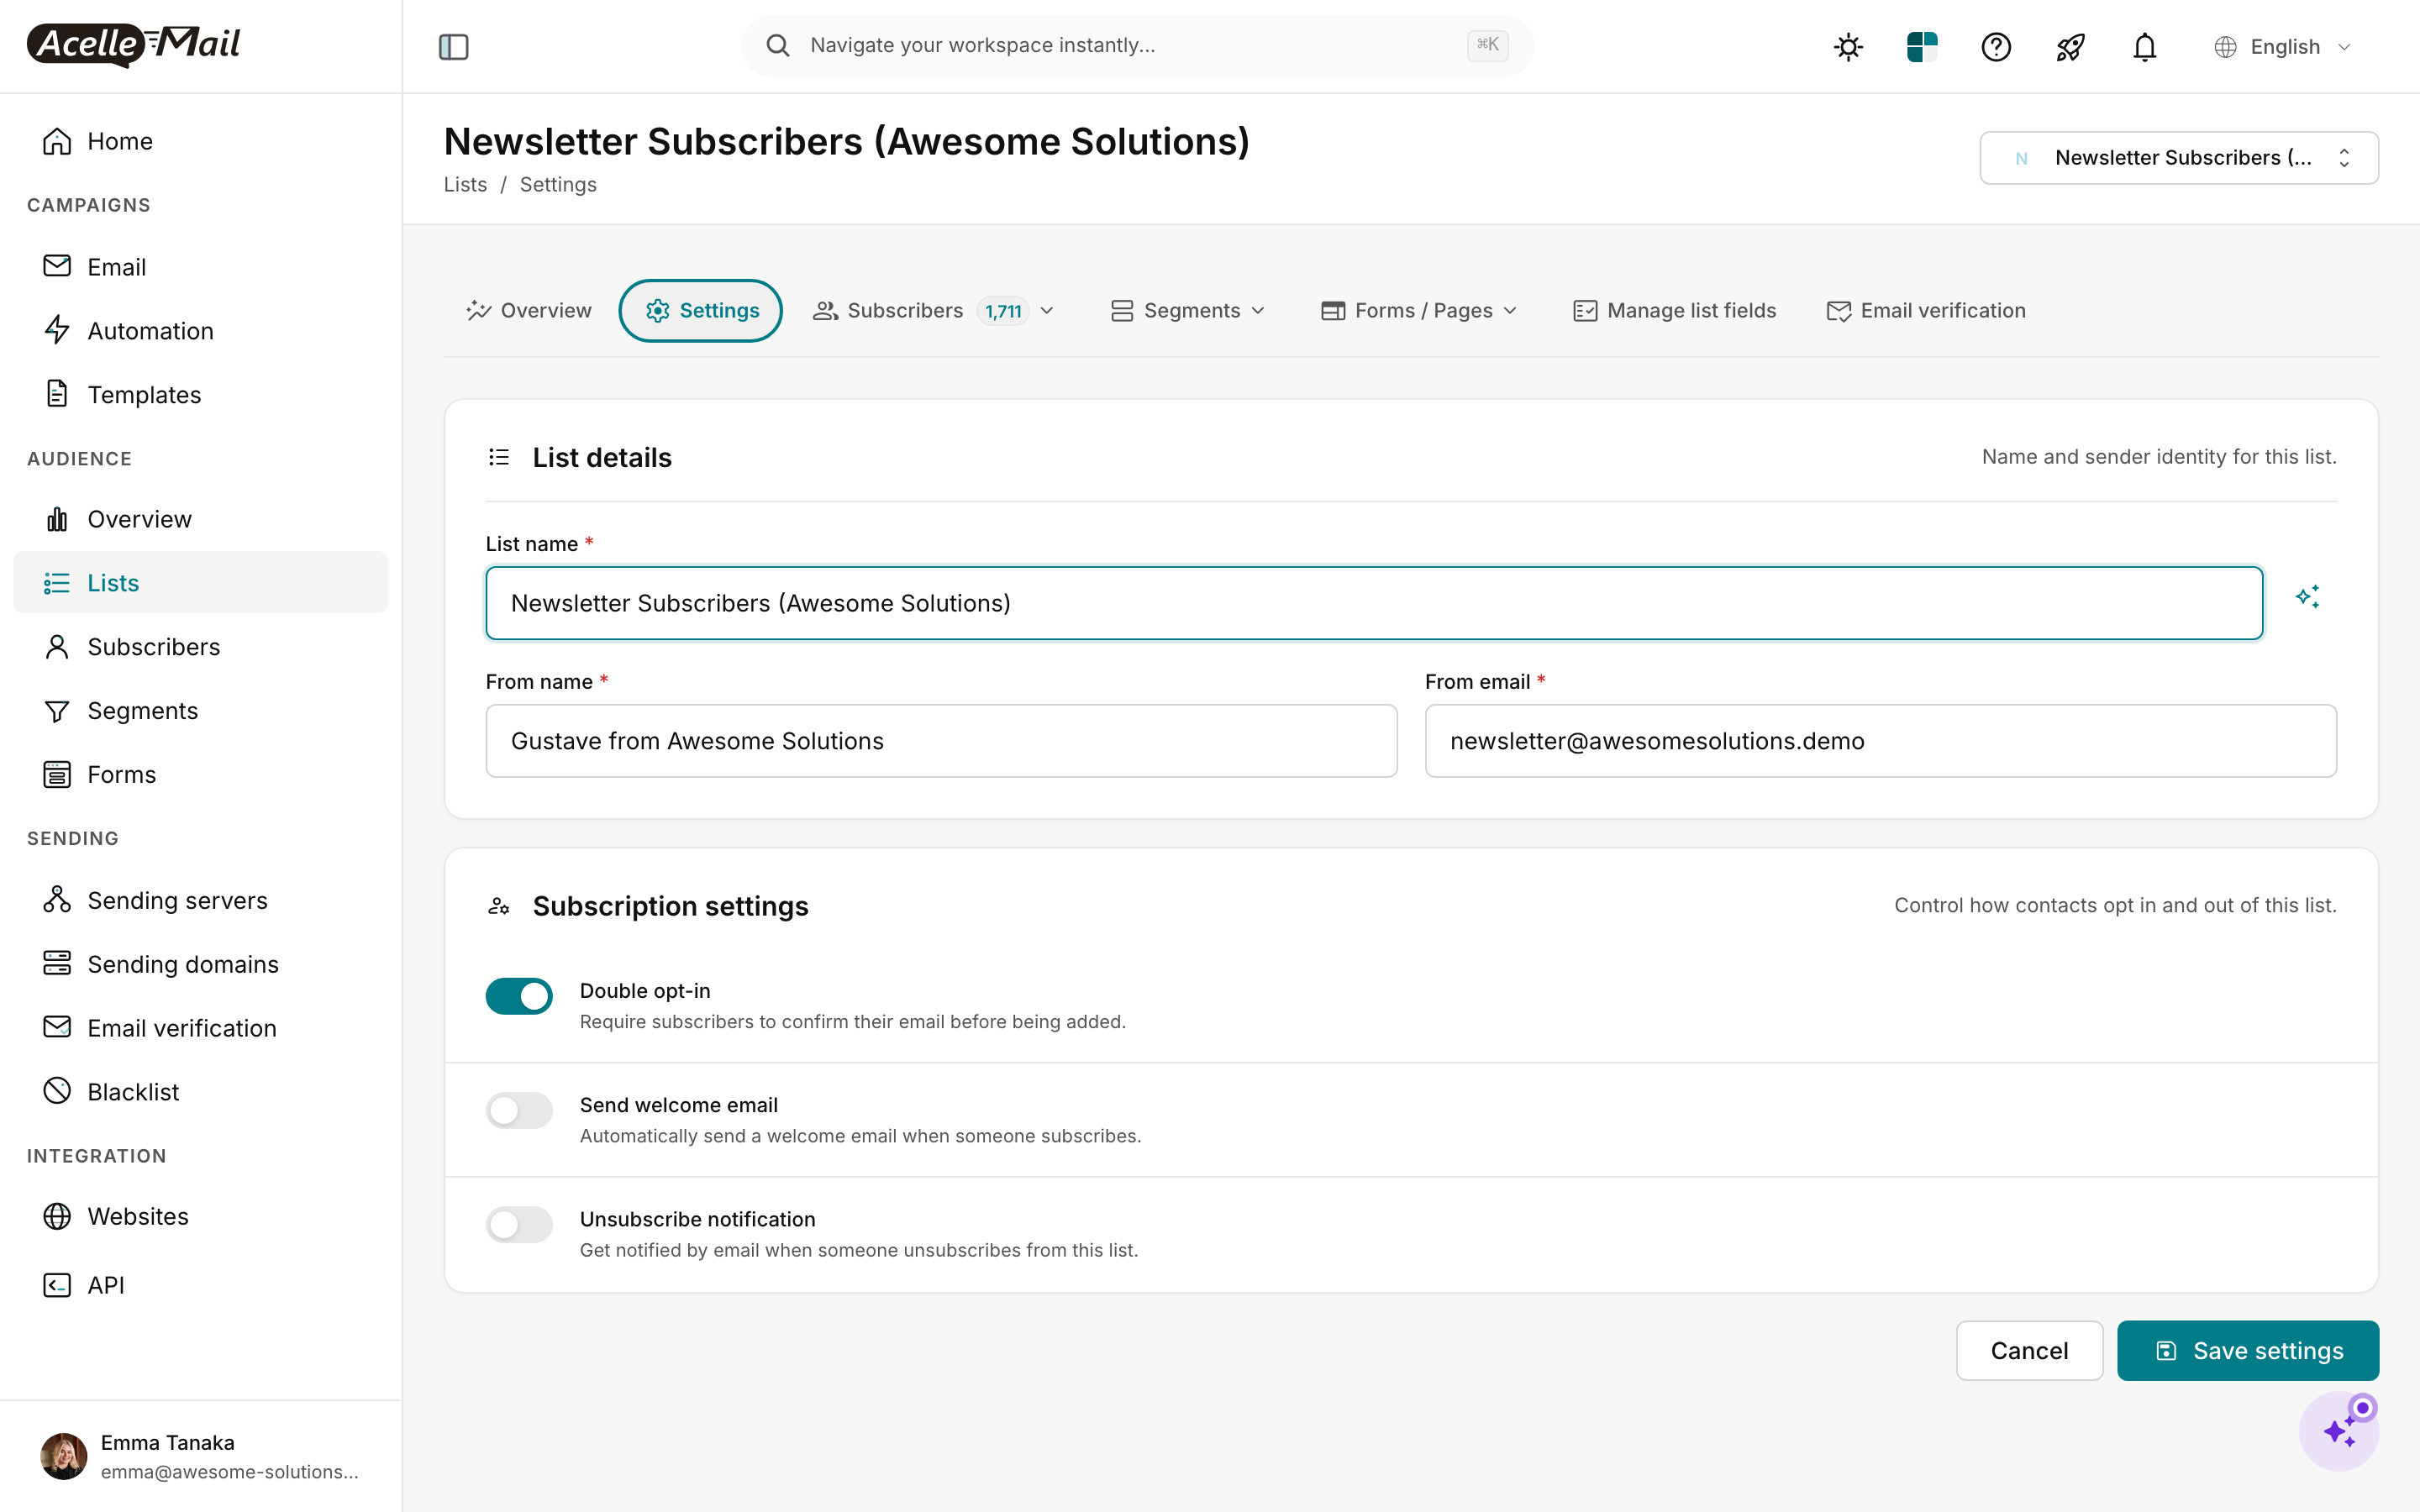
Scroll to the Subscription settings card. It has exactly three toggles — DOI is the top one. Each has a one-line description from AcelleMail itself:
- Double opt-in — "Require subscribers to confirm their email before being added."
- Send welcome email — "Automatically send a welcome email when someone subscribes."
- Unsubscribe notification — "Get notified by email when someone unsubscribes from this list."
Flip Double opt-in to ON. Click Save settings at the bottom right.
The setting is per-list. Every list has its own DOI toggle. A common mistake is to enable DOI on your main marketing list but forget to enable it on a smaller cold-traffic list you imported separately.
Step 2 — Customise the confirmation email#
When DOI is on, AcelleMail sends a confirmation email automatically. By default it uses a clean built-in template, but you almost certainly want to brand it.
Switch to the Forms / Pages tab on the same list (top navigation). Find the Confirmation email card.
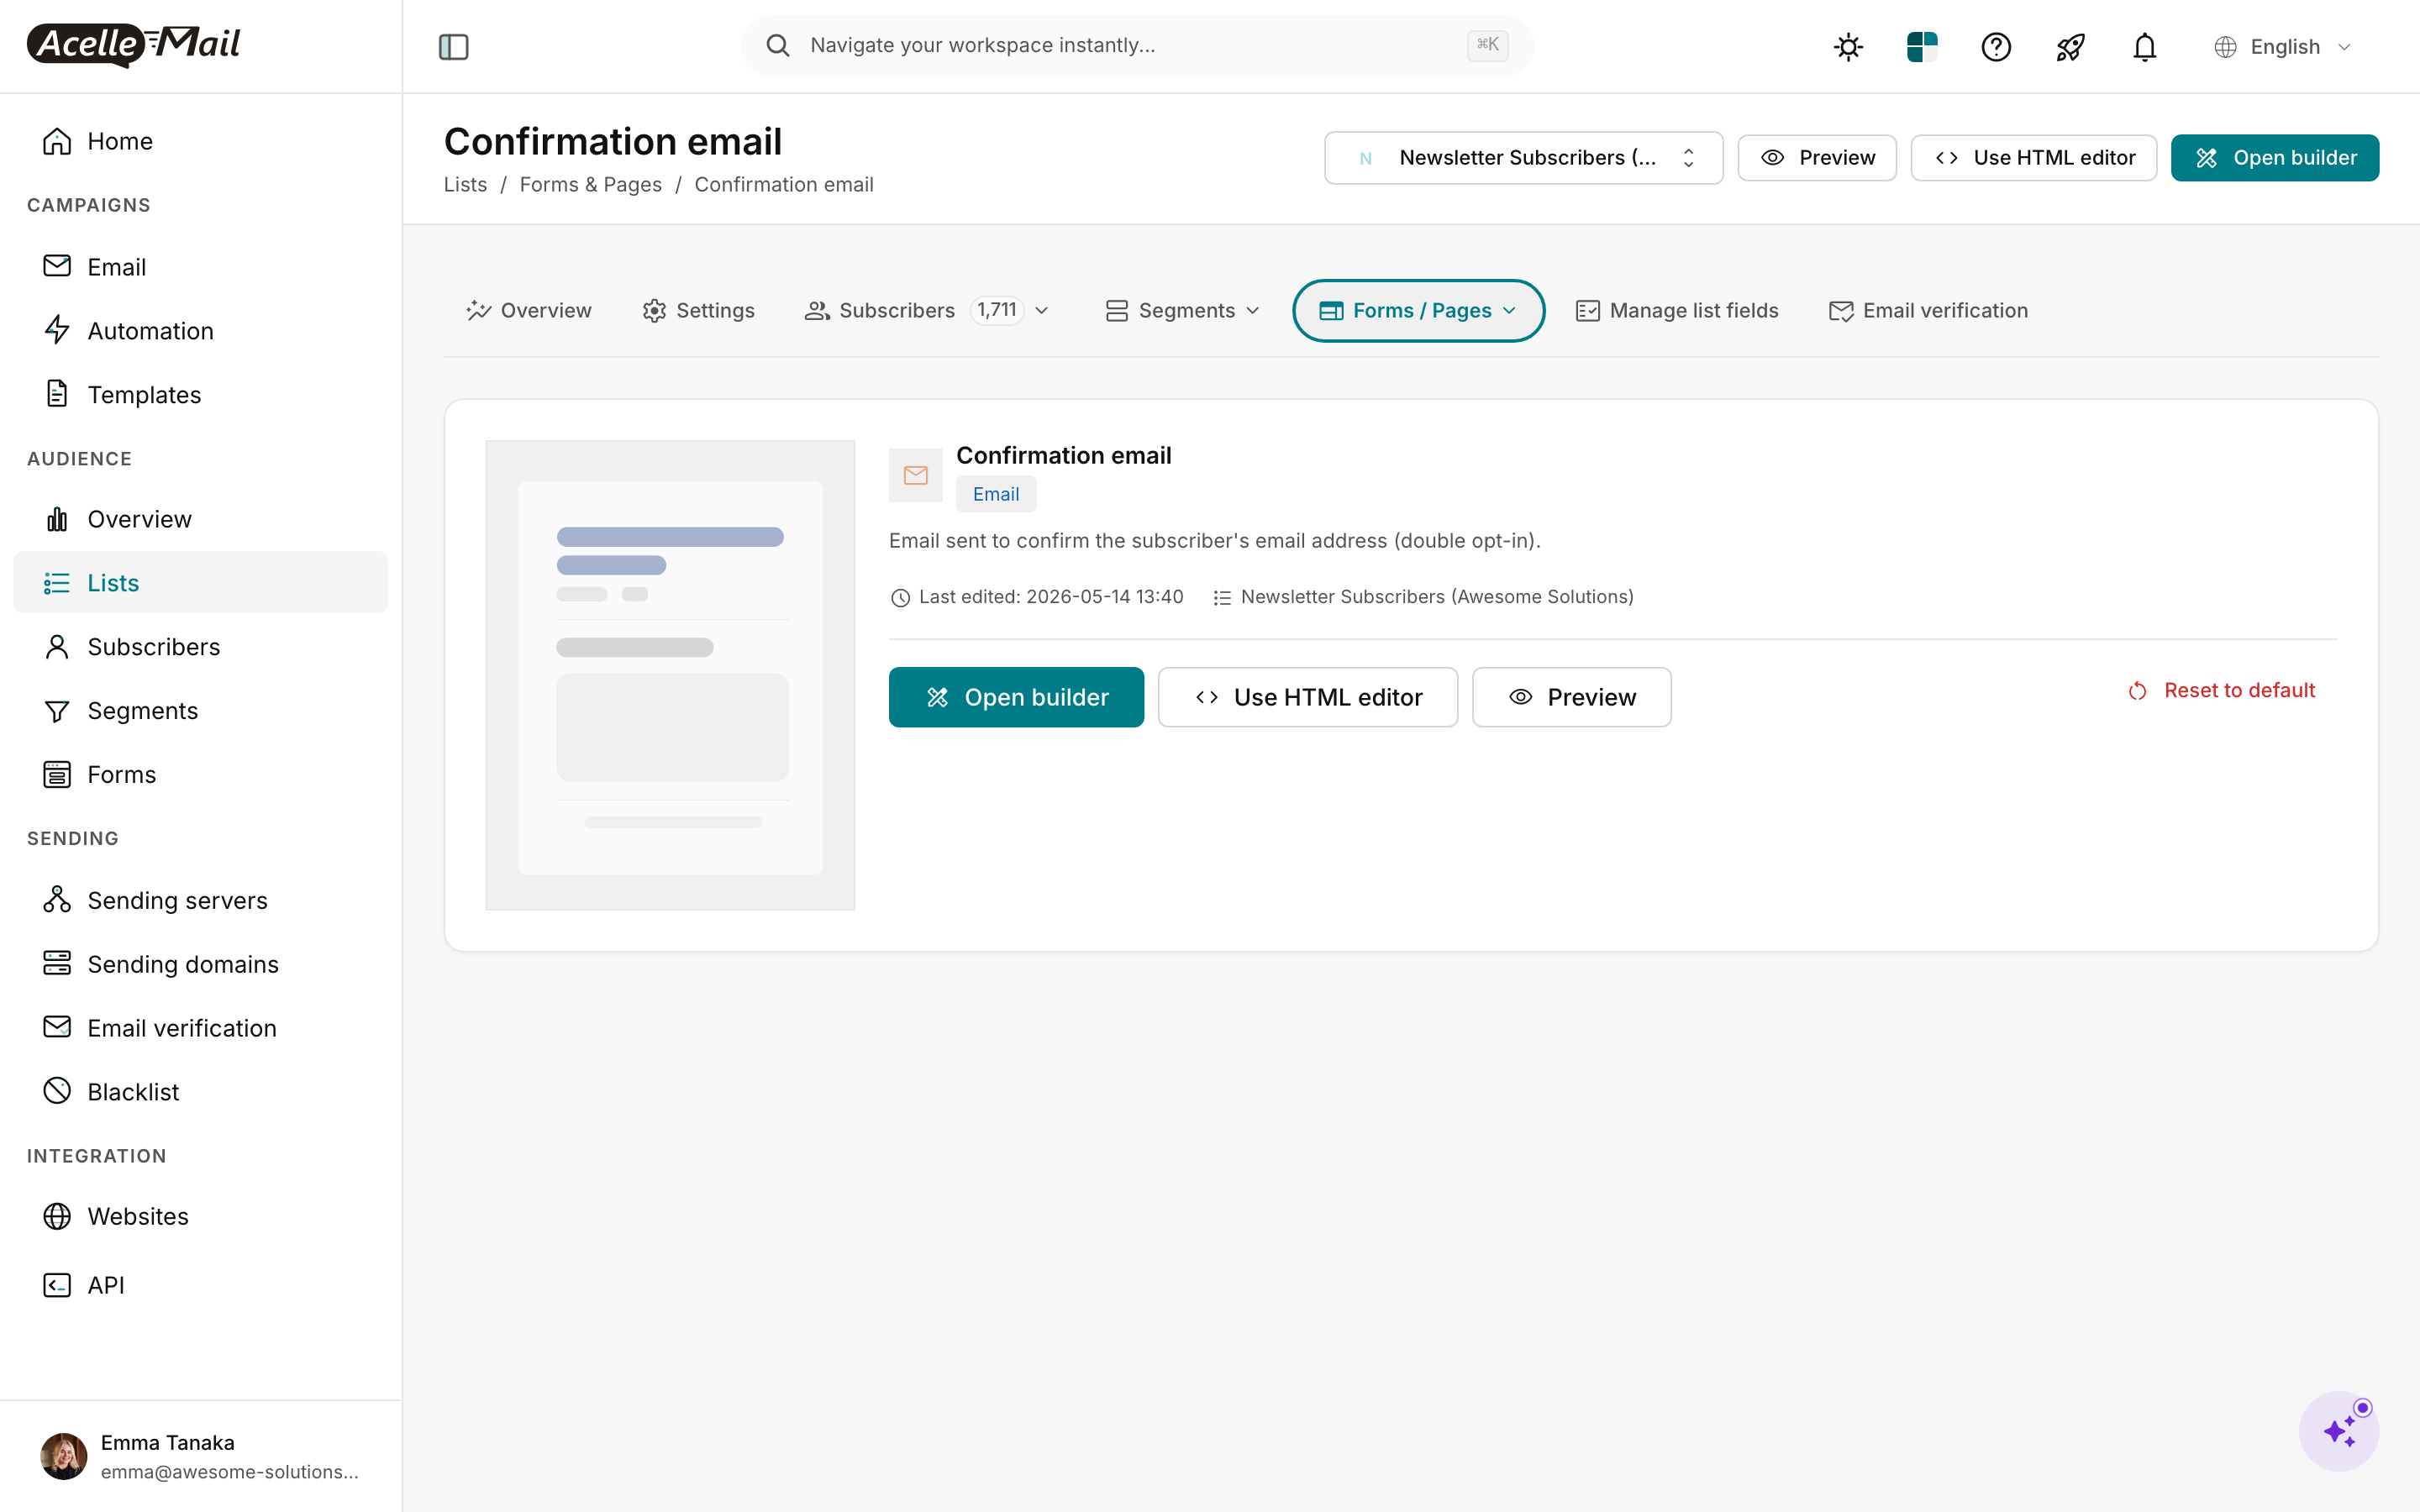
Three buttons for three workflows:
- Open builder — visual drag-and-drop editor. Same builder you use for campaigns; pick a layout, drop in your brand colours, write the subject + body. Best default.
- Use HTML editor — paste your own HTML. Use this only if you have a hand-coded transactional template.
- Preview — see the rendered version. Always do this before saving — the confirmation email is the first email your new subscriber sees from you.
A Reset to default link is on the right if you wreck the template — it restores AcelleMail's built-in version with the working confirmation link.
The one variable that MUST be present in the body: the confirmation link/button. AcelleMail's visual builder includes it by default as a Confirm Subscription button. If you switch to HTML and write your own template, you need the {CONFIRM_URL} placeholder somewhere clickable — otherwise the subscriber has nothing to click and never confirms.
Keep the email simple. One sentence + one button. The confirmation email is not a welcome email — its single job is to get the click. Save your brand story, lead-magnet delivery, and onboarding tour for the welcome email (which fires after the confirmation, if you also enabled Send welcome email in Step 1).
Step 3 — Watch pending vs subscribed states#
After DOI is on, the Subscribers tab of your list shows everyone, but with different statuses. Switch to the Subscribers tab and use the All statuses filter at the top.
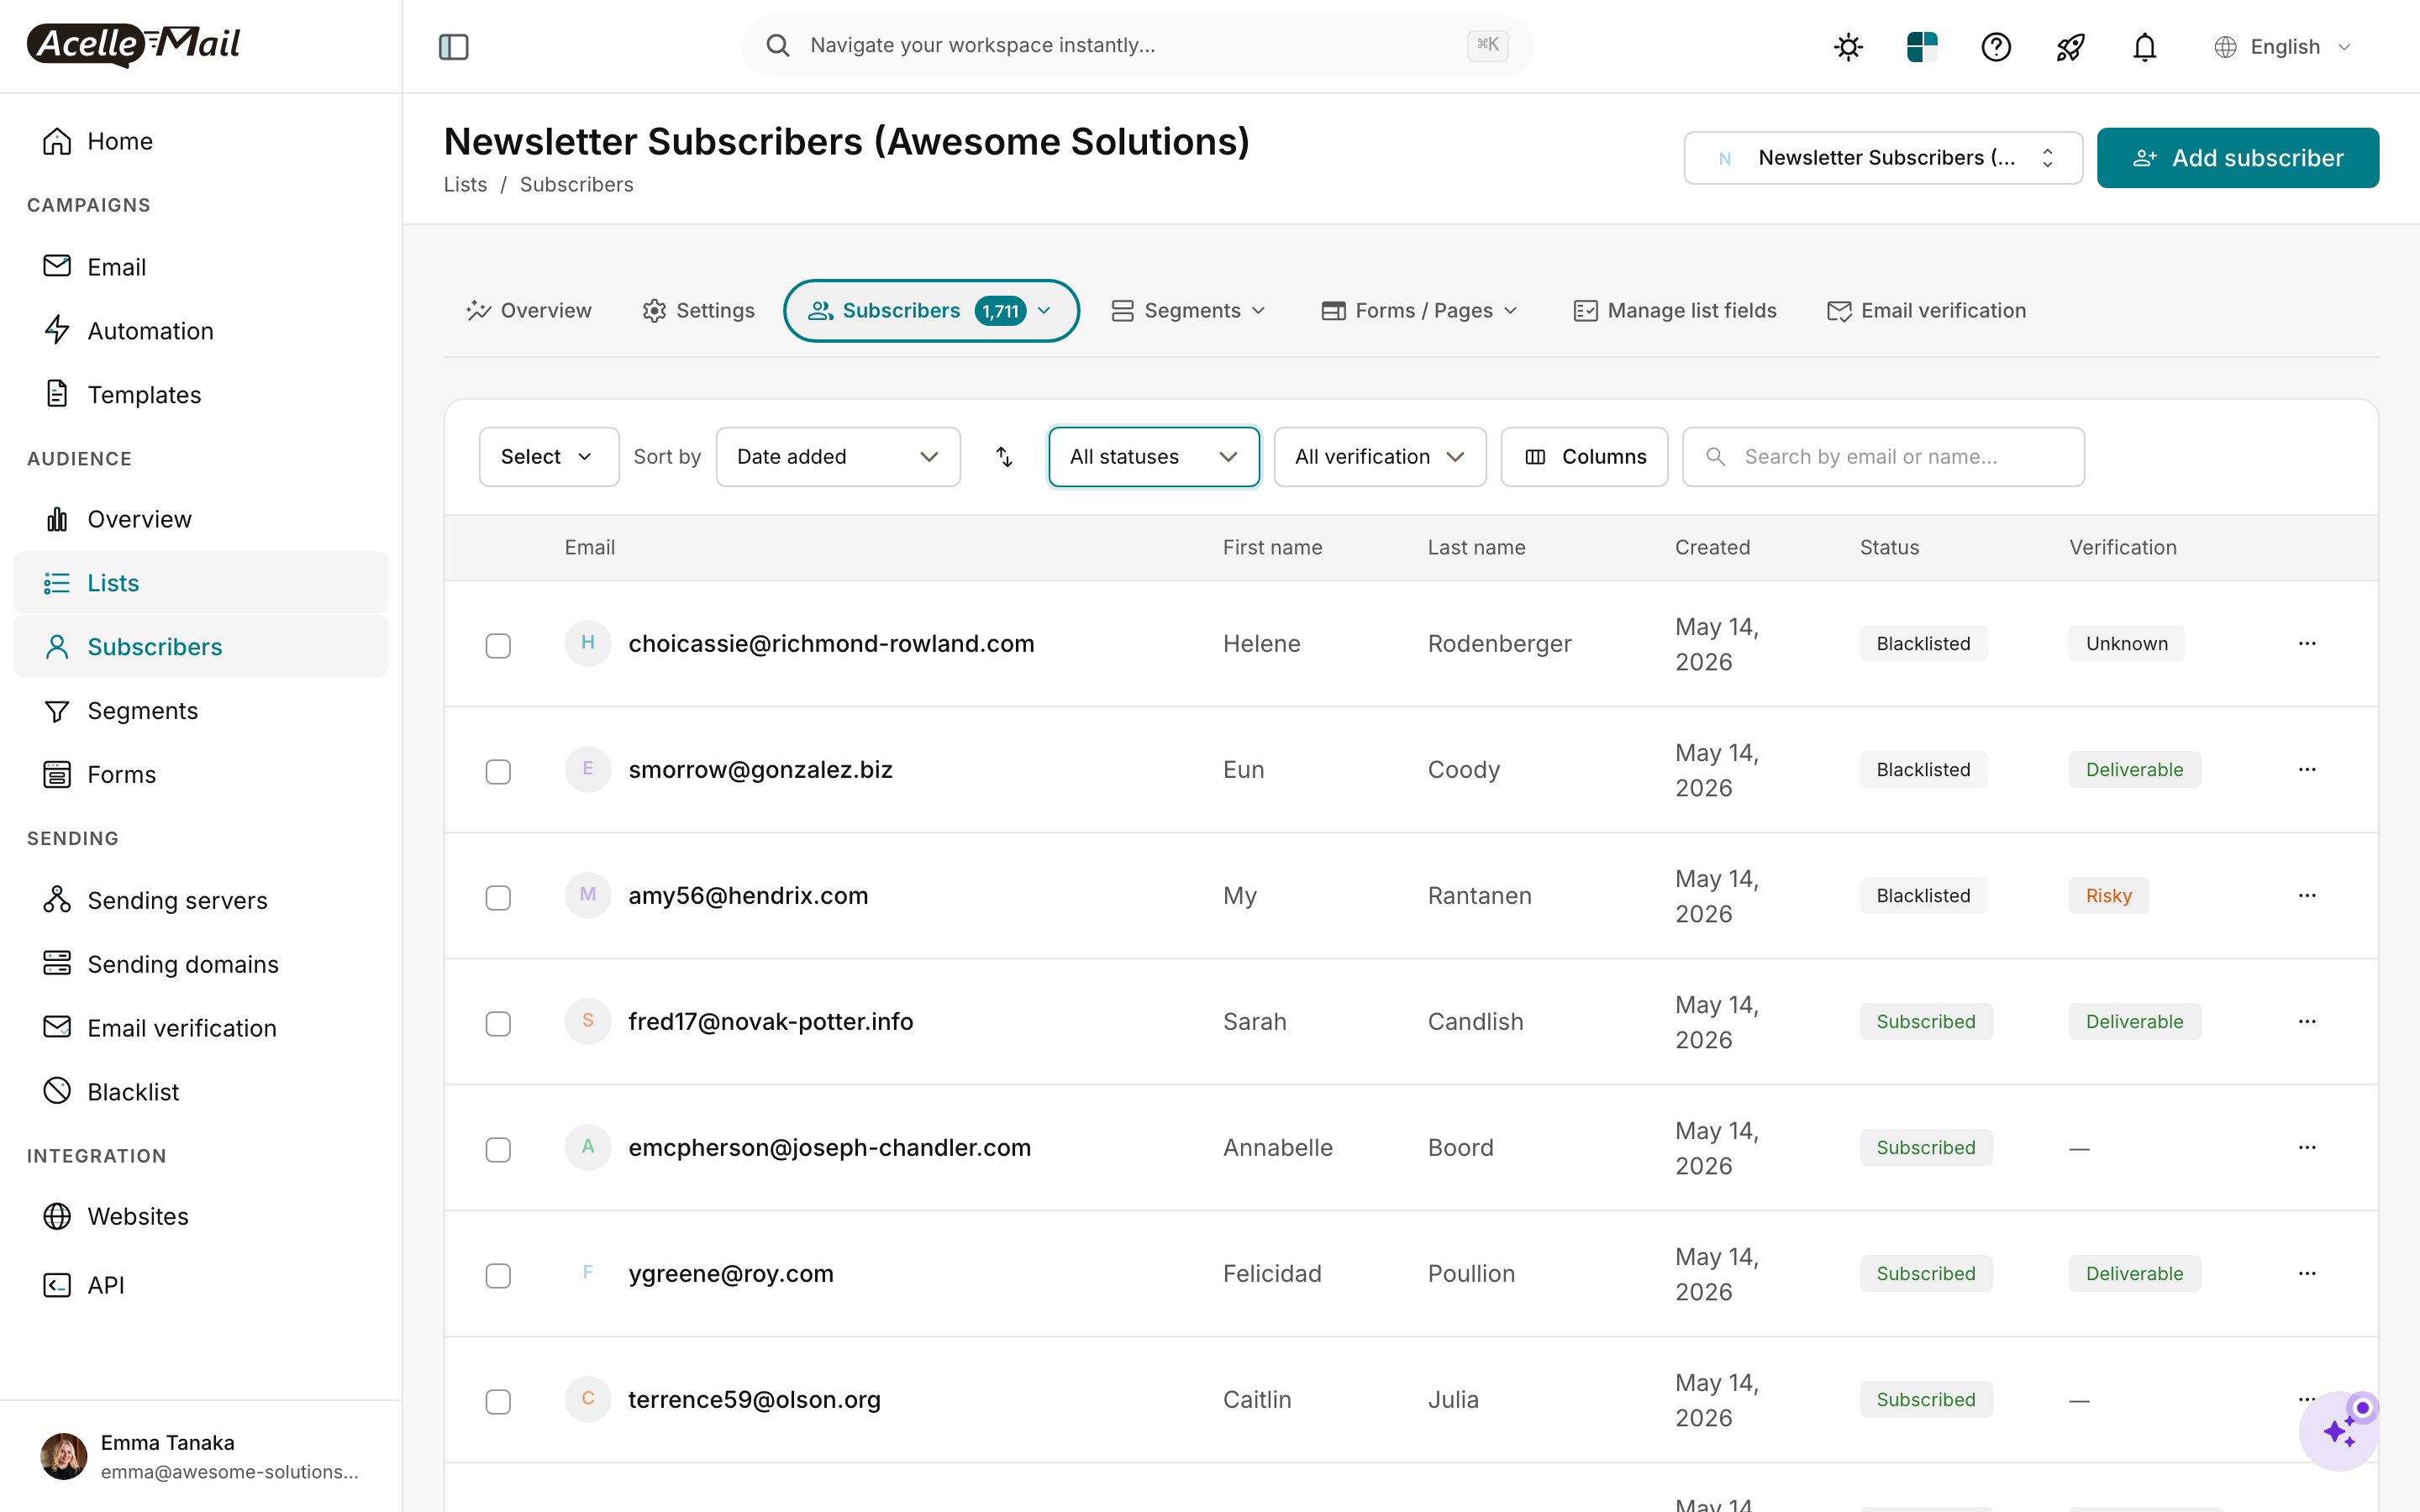
The Status filter gives you these states:
| Status |
What it means |
Reaches campaigns? |
| Subscribed |
Confirmed and active |
Yes |
| Unconfirmed |
Signed up but hasn't clicked the link yet |
No — only the confirmation email fires |
| Unsubscribed |
Clicked unsubscribe at some point |
No |
| Blacklisted |
On your blacklist (manually added or auto-bounced) |
No |
When auditing list quality, regularly filter for Unconfirmed subscribers older than 7 days. Either re-send the confirmation (via a campaign segment), or delete them — they're stale signups that won't ever engage.
Decision guide — Should you turn DOI on?#
| Situation |
Recommendation |
Why |
| Any EU / UK / Canadian subscribers |
ON. Always. |
GDPR / PECR / CASL need a timestamped consent event. The confirmation click is exactly that. |
| Brand new list with no prior emails sent |
ON. |
One-time list-quality win you'll never get back. New programs are most vulnerable to bots and typos. |
| You just imported a cold list (>6 months old) |
ON for that list specifically, before any send. |
Filters out dead addresses and treats it as a fresh re-permission pass. |
| High-volume e-commerce, US-only, with existing customer relationships |
OFF acceptable, but pair with email verification |
CAN-SPAM doesn't require prior opt-in for an existing-customer relationship; you still benefit from list quality. |
| High-intent landing page with a lead magnet |
ON. |
The lead-magnet email IS your confirmation gate — they want the magnet enough to click. No friction lost. |
| You're trying to recover deliverability |
ON immediately. |
Mailbox providers reward lists with confirmation events; bounces drop within 2 weeks of switching. |
| You're paid per acquired subscriber by a partner |
Check the contract |
Some lead-gen contracts only count confirmed subscribers — DOI is mandatory. |
When in doubt: turn it on. The list will grow 10–30% slower, but the 70–90% who confirm are the engaged subscribers who'd have driven your campaign metrics anyway.
Common issues#
| What you see |
What to do |
| New signups land as Subscribed even though you turned DOI on |
Confirm the toggle is on for the correct list (it's per-list, not global). Then submit a fresh test signup — old signups keep their original status. |
| Confirmation email is going to spam |
Open the email's Settings in Forms / Pages and confirm the From email matches a verified sending domain. Bare-IP / unverified-from is the #1 reason confirmation emails get filtered. |
| Subscribers click confirmation but nothing happens |
The confirmation link in your custom HTML template is missing the {CONFIRM_URL} placeholder. Click Reset to default in the template editor, then re-customise without removing the placeholder. |
| Pending count grows but never converts |
Send a one-off campaign to the Unconfirmed segment 24–48h after signup with a friendlier subject line. Some confirmations get caught in spam — a follow-up nudge often unlocks them. |
| You imported a CSV — now everyone's stuck on Unconfirmed |
Imports use the list's current DOI setting. If you didn't intend to require confirmation for an import: open Import settings and choose "Add as Subscribed" — or temporarily flip DOI off, import, then flip back on. |
After turning DOI on#
- Re-test your signup form end-to-end (incognito tab, real inbox). The confirmation email must arrive within 1 minute. If it doesn't, your sending server / sending domain has a deliverability problem you'd rather find now than during a campaign.
- Audit Unconfirmed subscribers monthly. Anything over 30 days unconfirmed is dead weight — delete or re-send confirmation.
- Pair DOI with a welcome email. Once they confirm, they expect something. Build the welcome series in Automation triggered on Subscriber confirms.
Related articles#
